44 KiB
If you already have an Android/iOS APP being public online, In-APP chat and call modules may need to be added as your business develops.
For instance, adding chat modules to video apps to facilitate interaction between viewers; adding chat modules to eshop apps to facilitate communication between customers and merchants; or adding chat modules to music and entertainment apps so that people with the same interests Taste groups, find organizations and communicate.
Adding the chat module requires the Android/iOS team to develop and access it separately, for your existing application. It not only consumes a lot, but also may cause inconsistent experience and out-of-sync message sending and receiving.
So, it is recommended to integrate Tencent Cloud Chat with Flutter, coding once and deploying to all platforms, which is really convenient.
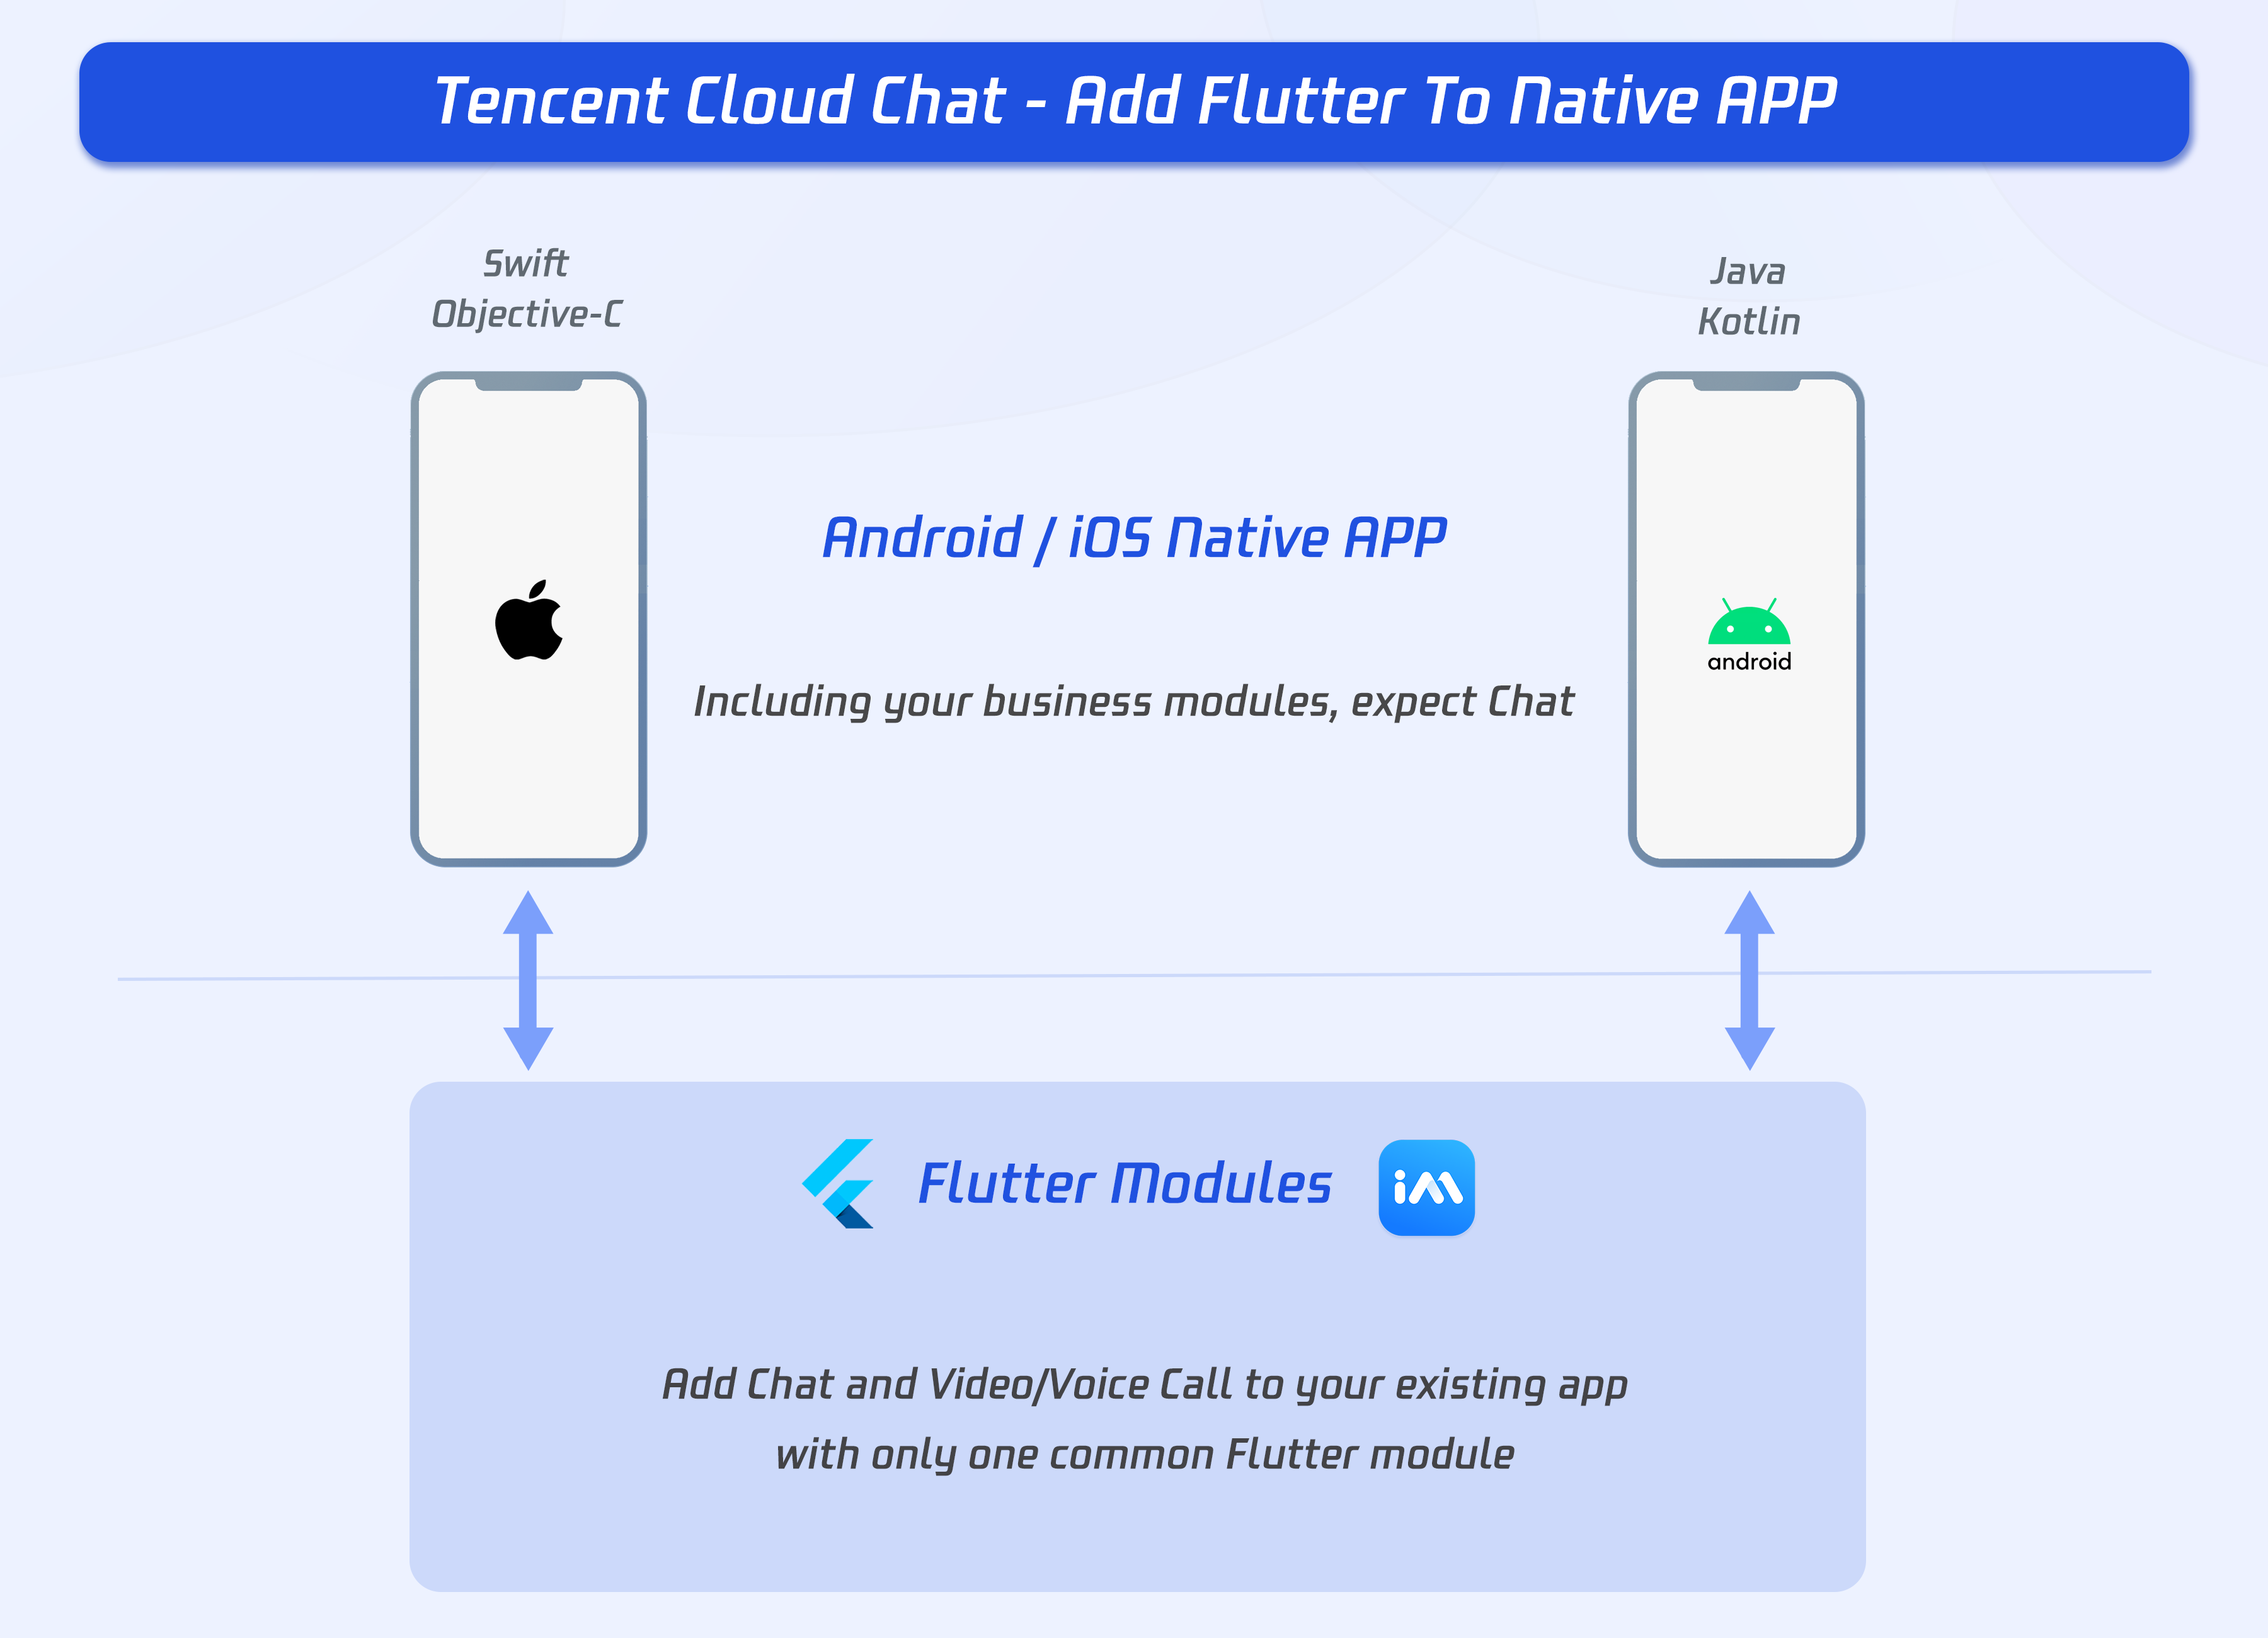
But, it’s sometimes not practical to rewrite your entire application in Flutter all at once. For those situations, Flutter can be integrated into your existing application piecemeal, as a library or module. That module can then be imported into your Android or iOS (currently supported platforms) app to render a part of your app’s UI in Flutter.
With this solution, you are able to integrate Tencent Cloud Chat Flutter SDKs to your existing Android/iOS application.
It could reduce your workload, to adding chat and call modules to your existing, to a large extent.
Environment requirements
| Version | |
|---|---|
| Flutter | Flutter 2.2.0 or later for the IM SDK; Flutter 2.10.0 or later for the TUIKit integration component library. |
| Android | Android Studio 3.5 or later; devices with Android 4.1 or later for apps. |
| iOS | Xcode 11.0 or later. Ensure that your project has a valid developer signature. |
| Tencent Cloud Chat Flutter SDK | tencent_im_sdk_plugin 5.0 or later, tencent_cloud_chat_uikit 0.2 or later. |
What you need to know first
Before starting, you are recommended to know about Tencent Cloud Chat and adding the Flutter module to existing apps.
Tencent Cloud Chat
Overall
Before starting, you are supposed to be familiar with our SDKs, and the basic usage.
Two main SDKs are included, non-UI SDK, and TUIKit.
In this tutorial, we will mainly develop with TUIKit, with UI library and basic business logic.
You could get to know about our SDKs, with Get Started.
Two modules
Two main modules are included, Chat and Call.
Chat module includes, sending and receiving messages, relationship management, etc.
Call module includes voice call and video call, for both one-to-one call and group call.
Adding Flutter to Native APP
Be simplified, the key of this solution is, embedding the Flutter module to your native application in a subproject. As the cross-platform feature of Flutter, one single Flutter module can be added to both Android and iOS projects.
To launch a Flutter screen from an existing iOS/Android, you start a FlutterEngine and a FlutterViewController/FlutterActiviy.
The FlutterEngine serves as a host to the Dart VM and your Flutter runtime, and the FlutterViewController/FlutterActivity attaches to a FlutterEngine to pass input events into Flutter and to display frames rendered by the FlutterEngine.
The FlutterEngine may have the same lifespan as your FlutterViewController/FlutterActivity or outlive your FlutterViewController/FlutterActivity.
Method Channel can be used to communicate between Native APP and Flutter module if necessary, like transmitting the current user info, the EXT of offline push and call data. Invoking a method on the method channel, and listening for the invoking with a MethodCallHandler being preset.
Adding to an Android app
Adding the Flutter module as a dependency of your existing app in Gradle. There are two ways to achieve this. The AAR mechanism creates generic Android AARs as intermediaries that package your Flutter module. This is good when your downstream app builders don’t want to have the Flutter SDK installed. But, it adds one more build step if you build frequently.
The source code subproject mechanism is a convenient one-click build process, but requires the Flutter SDK. This is the mechanism used by the Android Studio IDE plugin.
Option A - Depend on the Android Archive (AAR)
This option packages your Flutter library as a generic local Maven repository composed of AARs and POMs artifacts.
This option allows your team to build the host app without installing the Flutter SDK. You can then distribute the artifacts from a local or remote repository.
It's recommended to use this option for the released version.
Steps:
Run the following command on your Flutter module.
flutter build aar
Then, follow the on-screen instructions to integrate.
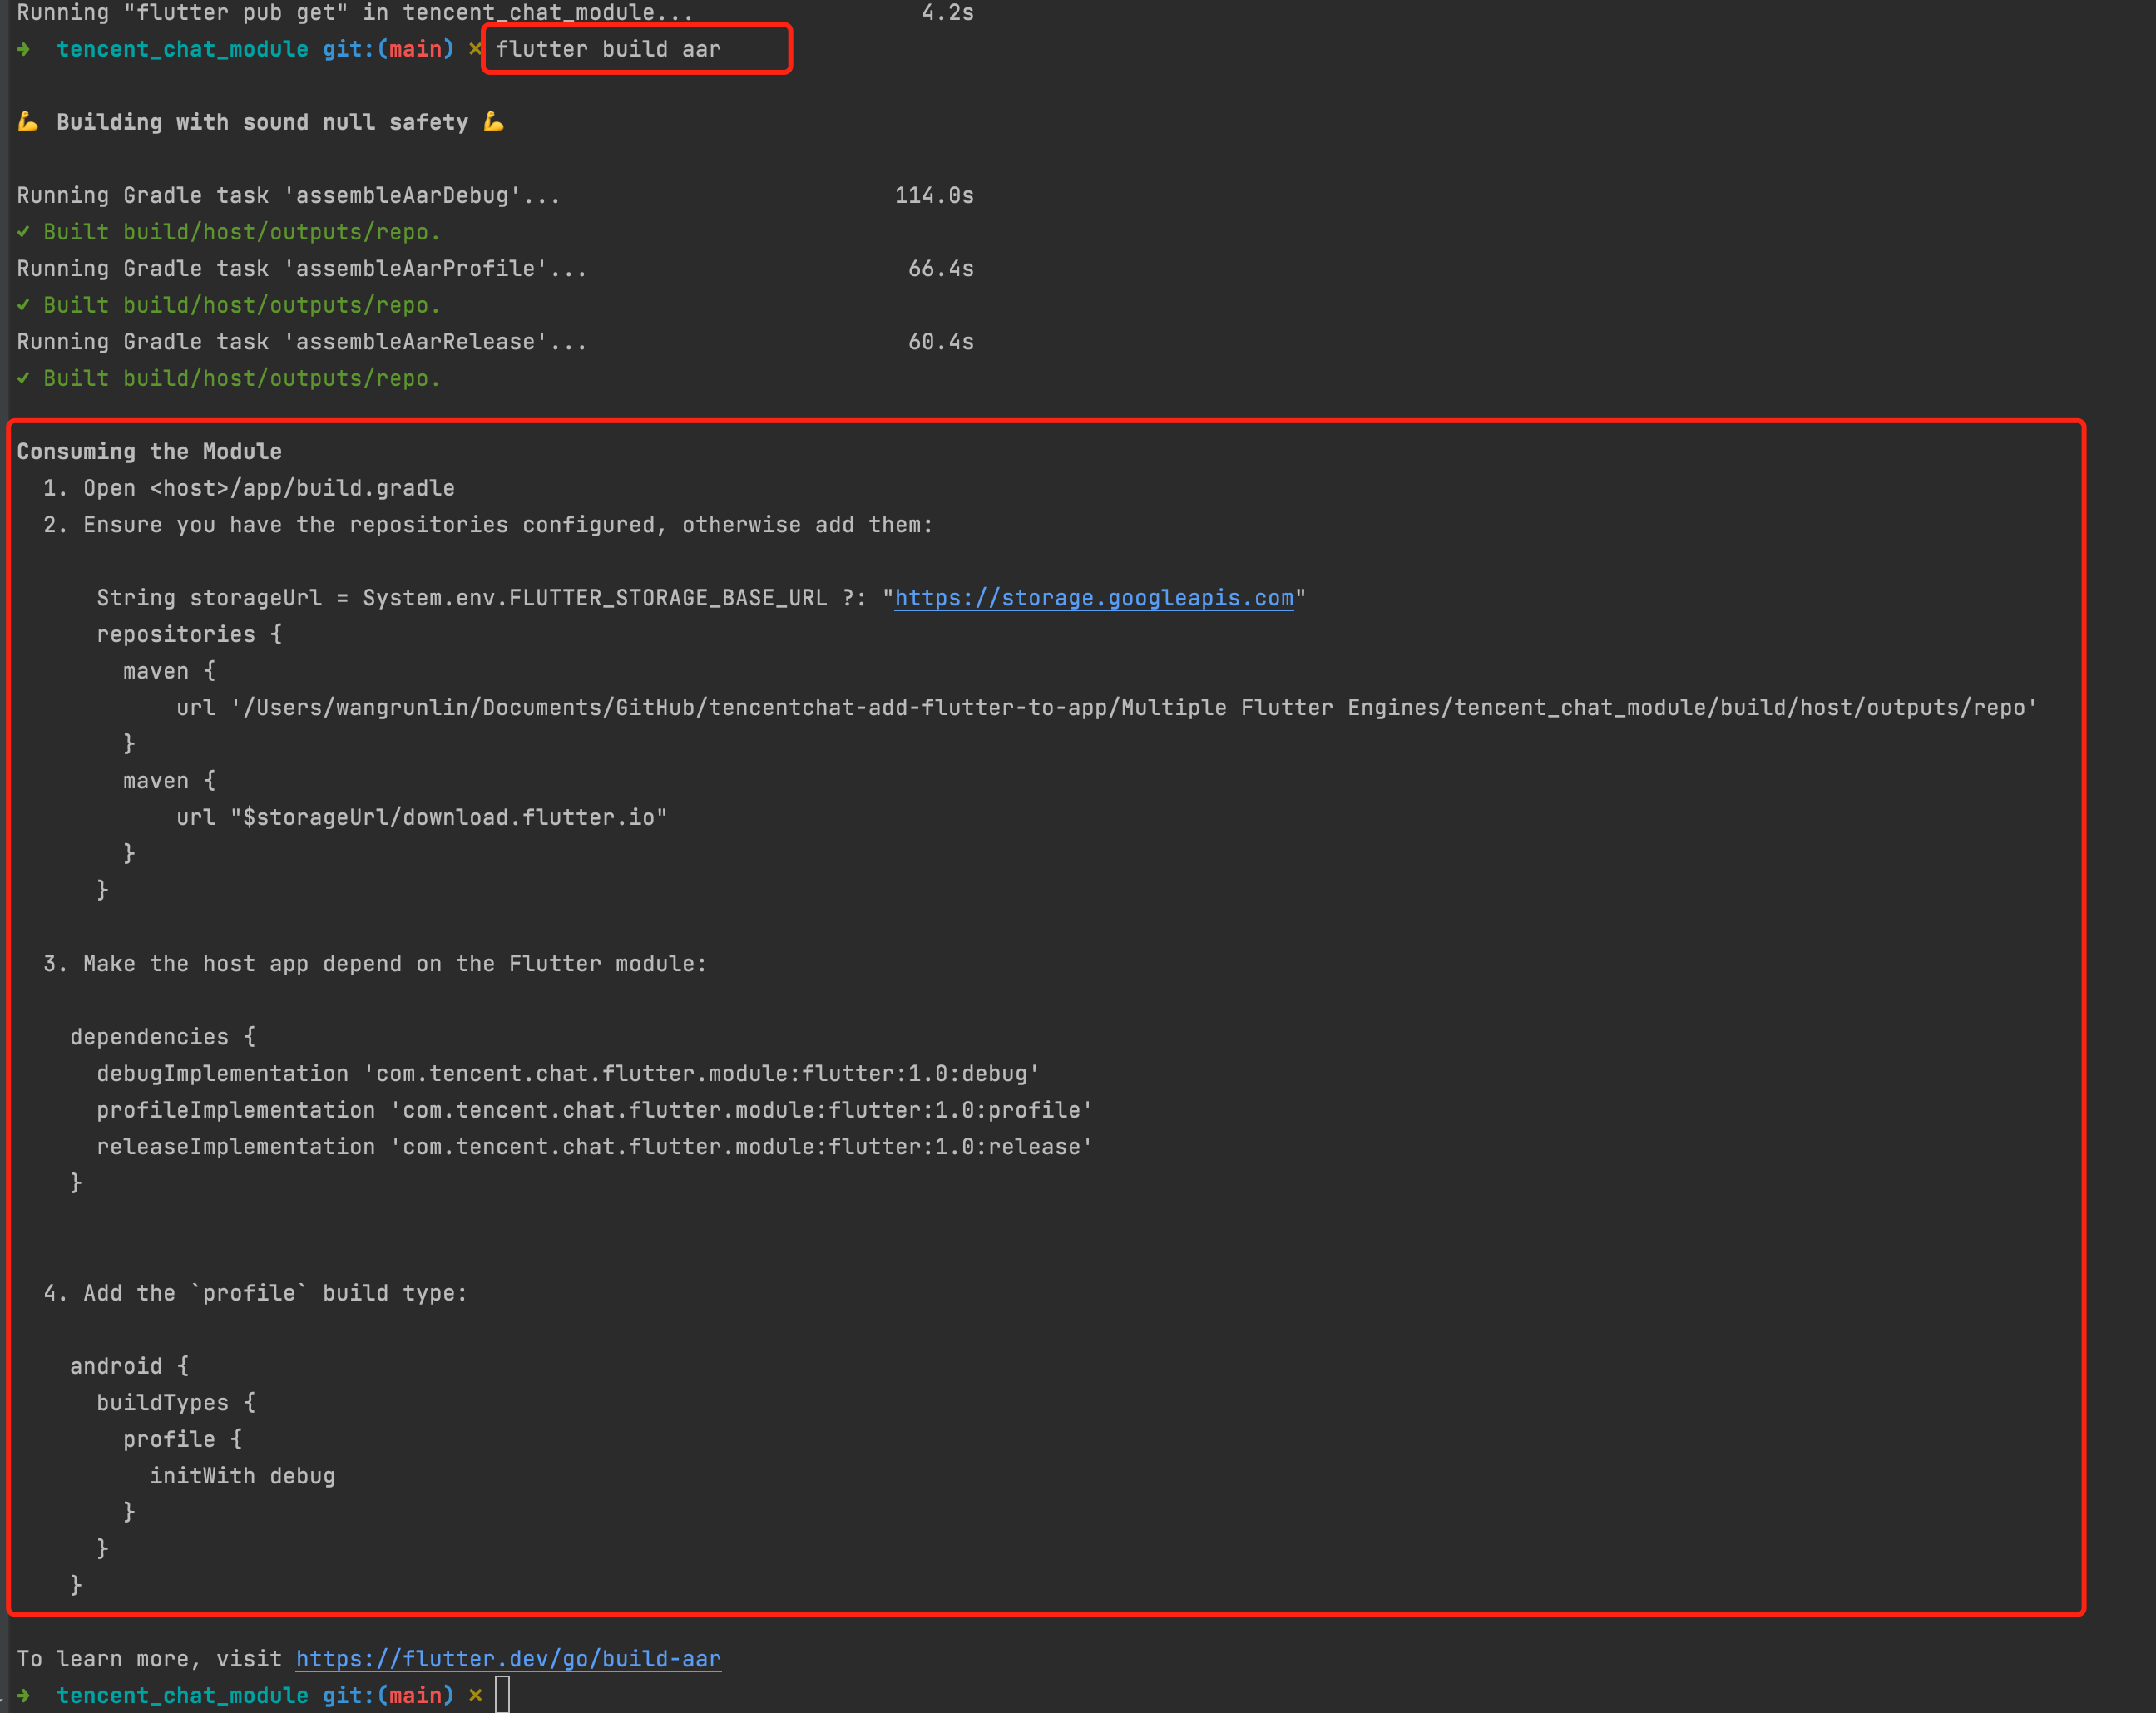
Your app now includes the Flutter module as a dependency.
Option B - Depend on the module’s source code
This option enables a one-step build for both your Android project and Flutter project.
This option is convenient when you work on both parts simultaneously and rapidly iterate, but your team must install the Flutter SDK to build the host app.
It's recommended to use this option when development and debugging.
Steps:
Include the Flutter module as a subproject in the host app’s settings.gradle:
// Include the host app project.
include ':app'                                    // assumed existing content
setBinding(new Binding([gradle: this]))                                // new
evaluate(new File(                                                     // new
settingsDir.parentFile,                                              // new
'tencent_chat_module/.android/include_flutter.groovy'                // new
))                                                                     // new
Introduce an implementation dependency on the Flutter module from your app:
dependencies {
implementation project(':flutter')
}
Your app now includes the Flutter module as a dependency.
Adding to an iOS app
There are two ways to embed Flutter in your existing application.
- Use the CocoaPods dependency manager and install Flutter SDK. (Recommended)
- Create frameworks for the Flutter engine, your compiled Dart code, and all Flutter plugins. Manually embed the frameworks, and update your existing application’s build settings in Xcode.
? Your app does not run on a simulator in Release mode because Flutter does not yet support outputting x86/x86_64 ahead-of-time (AOT) binaries for your Dart code. You can run in Debug mode on a simulator or a real device, and Release on a real device.
To run your app on a simulator follow the instructions in the bottom of section embed the frameworks.
Option A - Embed with CocoaPods and the Flutter SDK
This method requires every developer working on your project to have a locally installed version of the Flutter SDK. Simply build your application in Xcode to automatically run the script to embed your Dart and plugin code.
This allows rapid iteration with the most up-to-date version of your Flutter module without running additional commands outside of Xcode.
It's recommended to use this option when development and debugging.
Steps:
Add the following lines to your Podfile:
// The path of your Flutter module
flutter_chat_application_path = '../tencent_chat_module'

load File.join(flutter_chat_application_path, '.ios', 'Flutter', 'podhelper.rb')
For each Podfile target that needs to embed Flutter, call install_all_flutter_pods(flutter_application_path).
target 'MyApp' do
install_all_flutter_pods(flutter_chat_application_path)
end
In the Podfile’s post_install block, call flutter_post_install(installer), and with the statement of necessary permissions.
post_install do |installer|
flutter_post_install(installer) if defined?(flutter_post_install)
installer.pods_project.targets.each do |target|
   flutter_additional_ios_build_settings(target)
   target.build_configurations.each do |config|
         config.build_settings['GCC_PREPROCESSOR_DEFINITIONS'] ||= [
           '$(inherited)',
           'PERMISSION_MICROPHONE=1',
           'PERMISSION_CAMERA=1',
           'PERMISSION_PHOTOS=1',
         ]
       end
 end
end
Run pod install.
?
- When you change the Flutter plugin dependencies in
tencent_chat_module/pubspec.yaml, runflutter pub getin your Flutter module directory to refresh the list of plugins read by thepodhelper.rbscript. Then, run pod install again from the root directory of your application.- You may need to run
arch -x86_64 pod install --repo-updateon the Mac with Apple Silicon, like M1 or M2.
The podhelper.rb script embeds your plugins, Flutter.framework, and App.framework into your project.
Option B - Embed frameworks in Xcode
Alternatively, you can generate the necessary frameworks and embed them in your application by manually editing your existing Xcode project.
You may do this if members of your team can’t locally install Flutter SDK and CocoaPods, or if you don’t want to use CocoaPods as a dependency manager in your existing applications.
You must run flutter build ios-framework every time you make code changes in your Flutter module.
It's recommended to use this option for the released version.
Steps:
Run the following command on your Flutter module.
The following example assumes that you want to generate the frameworks to some/path/MyApp/Flutter/.
flutter build ios-framework --output=some/path/MyApp/Flutter/
Embed and link the generated frameworks into your existing application in Xcode.
The mode of adding
It's recommended to add the Flutter module to your existing application.
Two modules needed to be added by FlutterEngine, Chat and Call. For details, see here.
Two modes of FlutterEngine are provided, single FlutterEngine or two FlutterEngines with a FlutterEngineGroup.
| Mode | Introduction | Props | Cons | Demo |
|---|---|---|---|---|
| Single FlutterEngine | Both Chat and Call integrate into one FlutterEngine |
Convenient | It's required to navigate to the Flutter page, when new call income, to show the call status, which may interrupt the current status, with a relatively bad experience. | GitHub |
| Multiple FlutterEngines | Call and Chat modules located in two separate FlutterEngine | Only the presence of the calling page separately when a new call is incoming is necessary, and dismiss it automatically when call ends, without the navigating of current status, for a better experience. | Minimize for the calling page is not allowed. | GitHub |
Additionally, the solution of integrating both Native Chat SDK and Flutter Chat SDK is also provided. For details, see here, and demo can be found from GitHub.
Solution A: Multiple FlutterEngines (Recommended)
The advantage of using multiple Flutter instances is that each instance is independent and maintains its own internal navigation stack, UI, and application states. This simplifies the overall application code’s responsibility for state keeping and improves modularity. More details on the scenarios motivating the usage of multiple Flutters can be found at docs.flutter.dev/go/multiple-flutters.
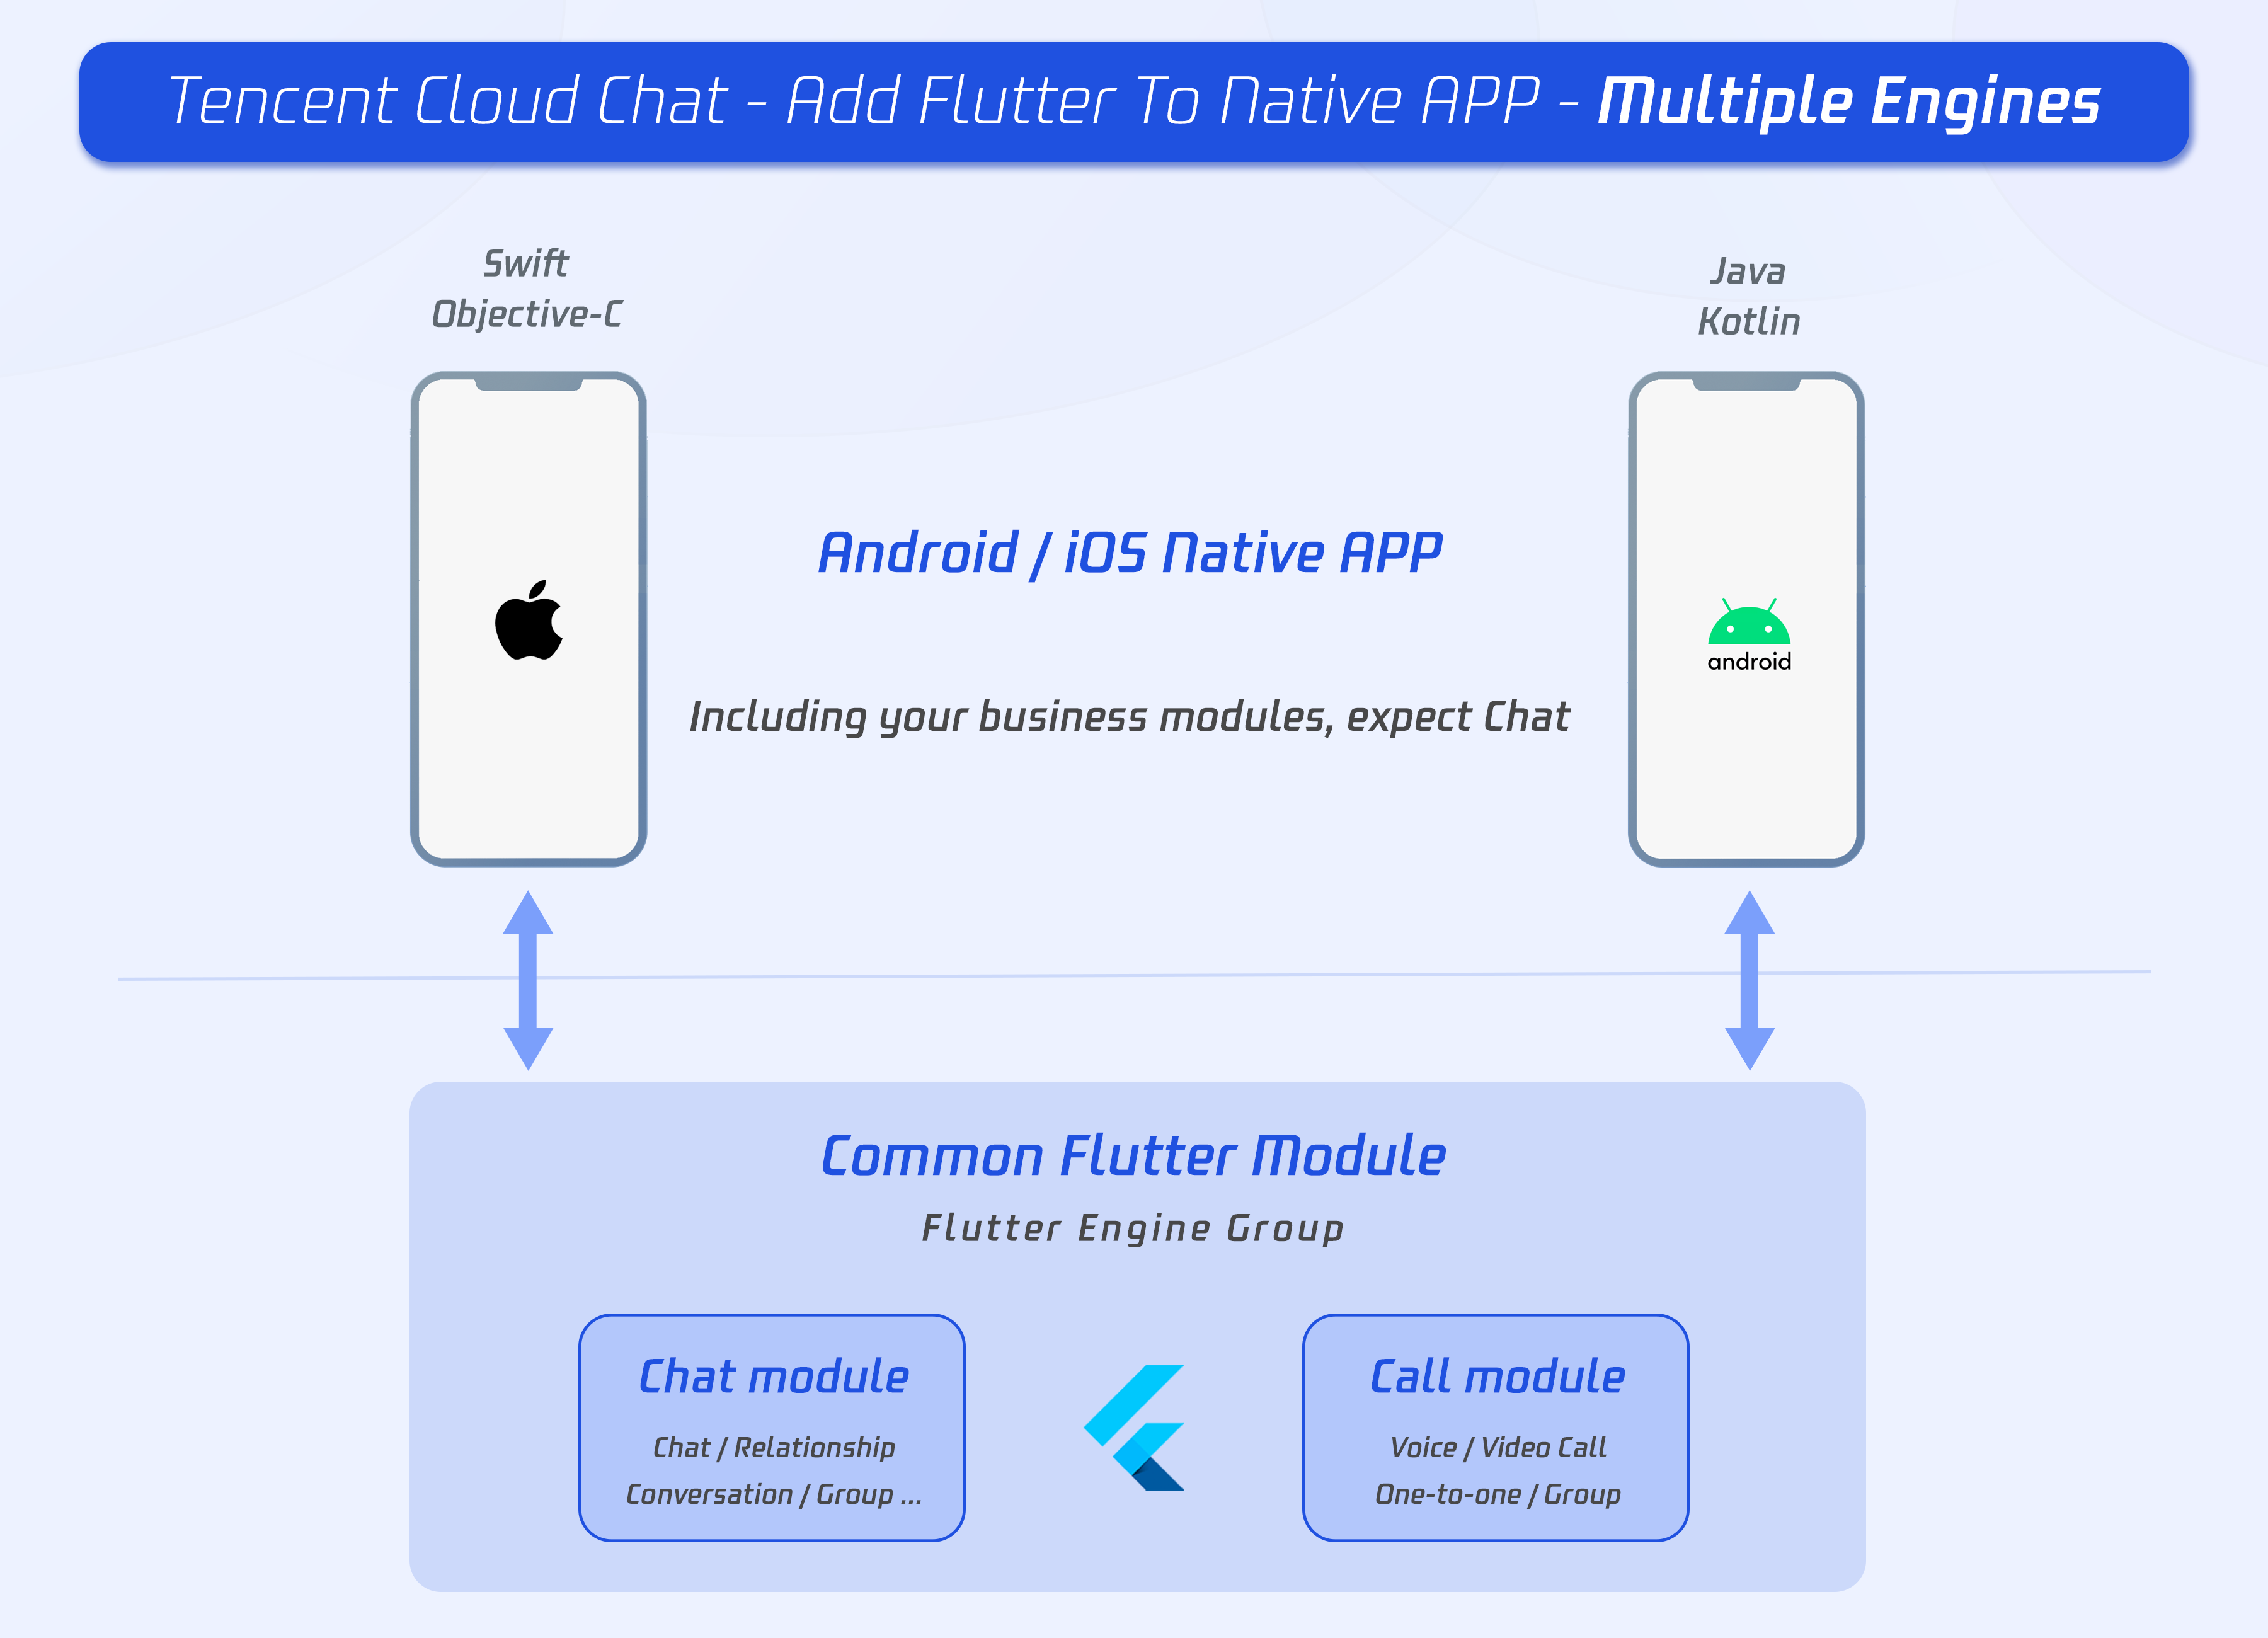
The primary API for adding multiple Flutter instances on both Android and iOS is based on a new FlutterEngineGroup class to construct FlutterEngines, rather than the FlutterEngine constructors used in the Solution B: Single FlutterEngine.
Whereas the FlutterEngine API was direct and easier to consume, the FlutterEngine spawned from the same FlutterEngineGroup have the performance advantage of sharing many of the common, reusable resources such as the GPU context, font metrics, and isolate group snapshot, leading to a faster initial rendering latency and lower memory footprint.
In our project, one single FlutterEngineGroup is used to manage the two FlutterEngines, including Chat and Call modules.

The development of Flutter module
To embed Flutter into your existing application, first create a Flutter module.
From the command line, run:
cd some/path/
flutter create --template module tencent_chat_module
A Flutter module project is created at some/path/tencent_chat_module/. From that directory, you can run the same flutter commands you would in any other Flutter project, like flutter run --debug or flutter build ios. You can also run the module in Android Studio/IntelliJ or VS Code with the Flutter and Dart plugins. This project contains a single-view example version of your module before it’s embedded in your existing application, which is useful for incrementally testing the Flutter-only parts of your code.
The tencent_chat_module module directory structure is similar to a normal Flutter application:
tencent_chat_module/
├── .ios/
│   ├── Runner.xcworkspace
│   └── Flutter/podhelper.rb
├── lib/
│   └── main.dart
├── test/
└── pubspec.yaml
Now, we can code within lib/.
The structure of lib/
?
The following structure and code is for demonstration purposes only, you could modify it to meet your actual needs dynamically.
Now, let's create three directory within lib/, including call, chat and common. Which is used for Call module, Chat module and some common classes separately.
tencent_chat_module/
├── lib/
│   └── call/
│   └── chat/
│   └── common/
Common model classes
Add the two following classes to a new file, common/common_model.dart. Used for definition the communication proxy between native and Flutter.
class ChatInfo {
String? sdkappid;
String? userSig;
String? userID;

ChatInfo.fromJSON(Map<String, dynamic> json) {
  sdkappid = json["sdkappid"].toString();
  userSig = json["userSig"].toString();
  userID = json["userID"].toString();
}

Map<String, String> toMap(){
  final Map<String, String> map = {};
  if(sdkappid != null){
    map["sdkappid"] = sdkappid!;
  }
  if(userSig != null){
    map["userSig"] = userSig!;
  }
  if(userID != null){
    map["userID"] = userID!;
  }
  return map;
}
}

class CallInfo{
String? userID;
String? groupID;

CallInfo();

CallInfo.fromJSON(Map<String, dynamic> json) {
  groupID = json["groupID"].toString();
  userID = json["userID"].toString();
}

Map<String, String> toMap(){
  final Map<String, String> map = {};
  if(userID != null){
    map["userID"] = userID!;
  }
  if(groupID != null){
    map["groupID"] = groupID!;
  }
  return map;
}
}
Chat Module
The following files and codes are located in the lib/chat directory.
- Create a file,
model.dart, used as a state container. This model is used to initialize and maintain the instance of Tencent Cloud Chat, offline line push module, global state, and the communication with native apps. Is the core of the Chat module. Detailed implementation can refer to the source code of the demo, while it's recommended to focus on these three functions:
- Future _handleMessage(MethodCall call): Listening for the message call from native app.
- Future handleClickNotification(Map<String, dynamic> msg): The function invoked by the callback after clicking the notification.
- Future initChat(): Initialize and log in Tencent Cloud Chat SDK and offline push plugin, upload token. This method uses the sync lock mechanism to ensure that only one can be executed at the same time, and after the initialization is successful, it will not be executed repeatedly.
?
Please configure the offline push before uploading the token and use this capability, referring to this documentation.
- Create a file,
chat_main.dart, used as the main entrance of the chat module.
- Also, used as the home page of the chat module.
- It shows the loading status before logged in, followed by the conversation list.
- Besides, the current status of the application needs to be reported to the Tencent Cloud Chat backend upon each foreground/background switch from here. Referring to this documentation.
- Detailed implementation can refer to the source code of the demo.
-
Create a file,
push.dart, used for maintaining the offline push plugin. Detailed implementation can refer to the source code of the demo. -
Create a file,
conversation.dart, used for implementing conversation list widgetTIMUIKitConversation. Detailed implementation can refer to the source code of the demo. -
Create a file,
user_profile.dart, used to implement the user profile widgetTIMUIKitProfile. Detailed implementation can refer to the source code of the demo. -
Create a file,
group_profile.dart, used to implement group profile widgetTIMUIKitGroupProfile. Detailed implementation can refer to the source code of the demo. -
Create a file,
chat.dart, used for implementing the history message list and sending messages widgetTIMUIKitChat. This page can also navigate touser_profile.dartandconversation.dart.Detailed implementation can refer to the source code of the demo.
Now, Chat module has been developed, with the following structure:
tencent_chat_module/
├── lib/
│   └── call/
│       └── chat.dart
│       └── model.dart
│       └── chat_main.dart
│       └── push.dart
│       └── conversation.dart
│       └── user_profile.dart
│       └── group_profile.dart
│   └── chat/
│   └── common/
Call Module
This module is used for voice call and video call, provided by our calling plugin.
The key feature of this module is, when receiving the income calling, invoke the method to native requesting show this page; or, initiate a call to others, when receiving the request from Chat module, via native.
The following files and codes are located in the lib/calls directory.
- Create a file,
model.dart, used as a state container. This model is used for initializing and maintaining the instance of Calling plug-in, global state, and the communication with native apps. Is the core of the Call module. Detailed implementation can refer to the source code of the demo, while it's recommended to focus on these three functions:
- _onRtcListener = TUICallingListener(...): The listener of the calling events, notify native to show this page, when receiving a new call.
- Future _handleMessage(MethodCall call): The listener of the method channel call events, mainly used for initiating a call to others, when receiving the request from the Chat module, via native.
- Create a file,
call_main.dart, used as the main entry point of the Call module. ThenavigatorKeyused for the launch calling page is supposed to be added here. Detailed implementation can refer to the source code of the demo.
Configure the entry point for each modules
After developing the three parts above, now we can configure the entry point for each module, used as the entrance for FlutterEngine.
- Default entry
Open lib/main.dart, modify the default main functions to return an empty MaterialApp.
This function is the entry point, while not being used in this solution.
As, the name of the entry point is necessary while the creation of a FlutterEngine, and we won't create a FlutterEngine without a name.
void main() {
WidgetsFlutterBinding.ensureInitialized();

runApp(MaterialApp(
  title: 'Flutter Demo',
  theme: ThemeData(
    primarySwatch: Colors.blue,
  ),
  home: Container(),
));
}
- The entry for Chat module
Use @pragma('vm:entry-point') annotation to mark a method as an entry point. The method name chatMain is the name of the entry.
In Native, this name is also used to create the corresponding FlutterEngine.
Use global ChangeNotifierProvider status management to maintain ChatInfoModel data and business logic.
@pragma('vm:entry-point')
void chatMain() {
// This call ensures the Flutter binding has been set up before creating the
// MethodChannel-based model.
WidgetsFlutterBinding.ensureInitialized();

final model = ChatInfoModel();

runApp(
  ChangeNotifierProvider.value(
    value: model,
    child: const ChatAPP(),
  ),
);
}
- The entry for Call module
This entry point is named as callMain.
Use global ChangeNotifierProvider status management to maintain CallInfoModel data and business logic.
@pragma('vm:entry-point')
void callMain() {
// This call ensures the Flutter binding has been set up before creating the
// MethodChannel-based model.
WidgetsFlutterBinding.ensureInitialized();

final model = CallInfoModel();

runApp(
  ChangeNotifierProvider.value(
    value: model,
    child: const CallAPP(),
  ),
);
}
So far, the Dart code for the Flutter Module has been written.
Now, let's take a look at the native integration for your existing app.
iOS Native development
Here, we take Swift as an example, while Objective-C is also available.
?
The following structure and code is for demonstration purposes only, you could modify it to meet your actual needs dynamically.
Open your iOS project within XCode.
If your existing application (MyApp) doesn’t already have a Podfile, follow the CocoaPods getting started guide to add a Podfile to your project.
Import Flutter Module
Please refer to this part, adding the Flutter module to your existing iOS app.
FlutterEngineGroup
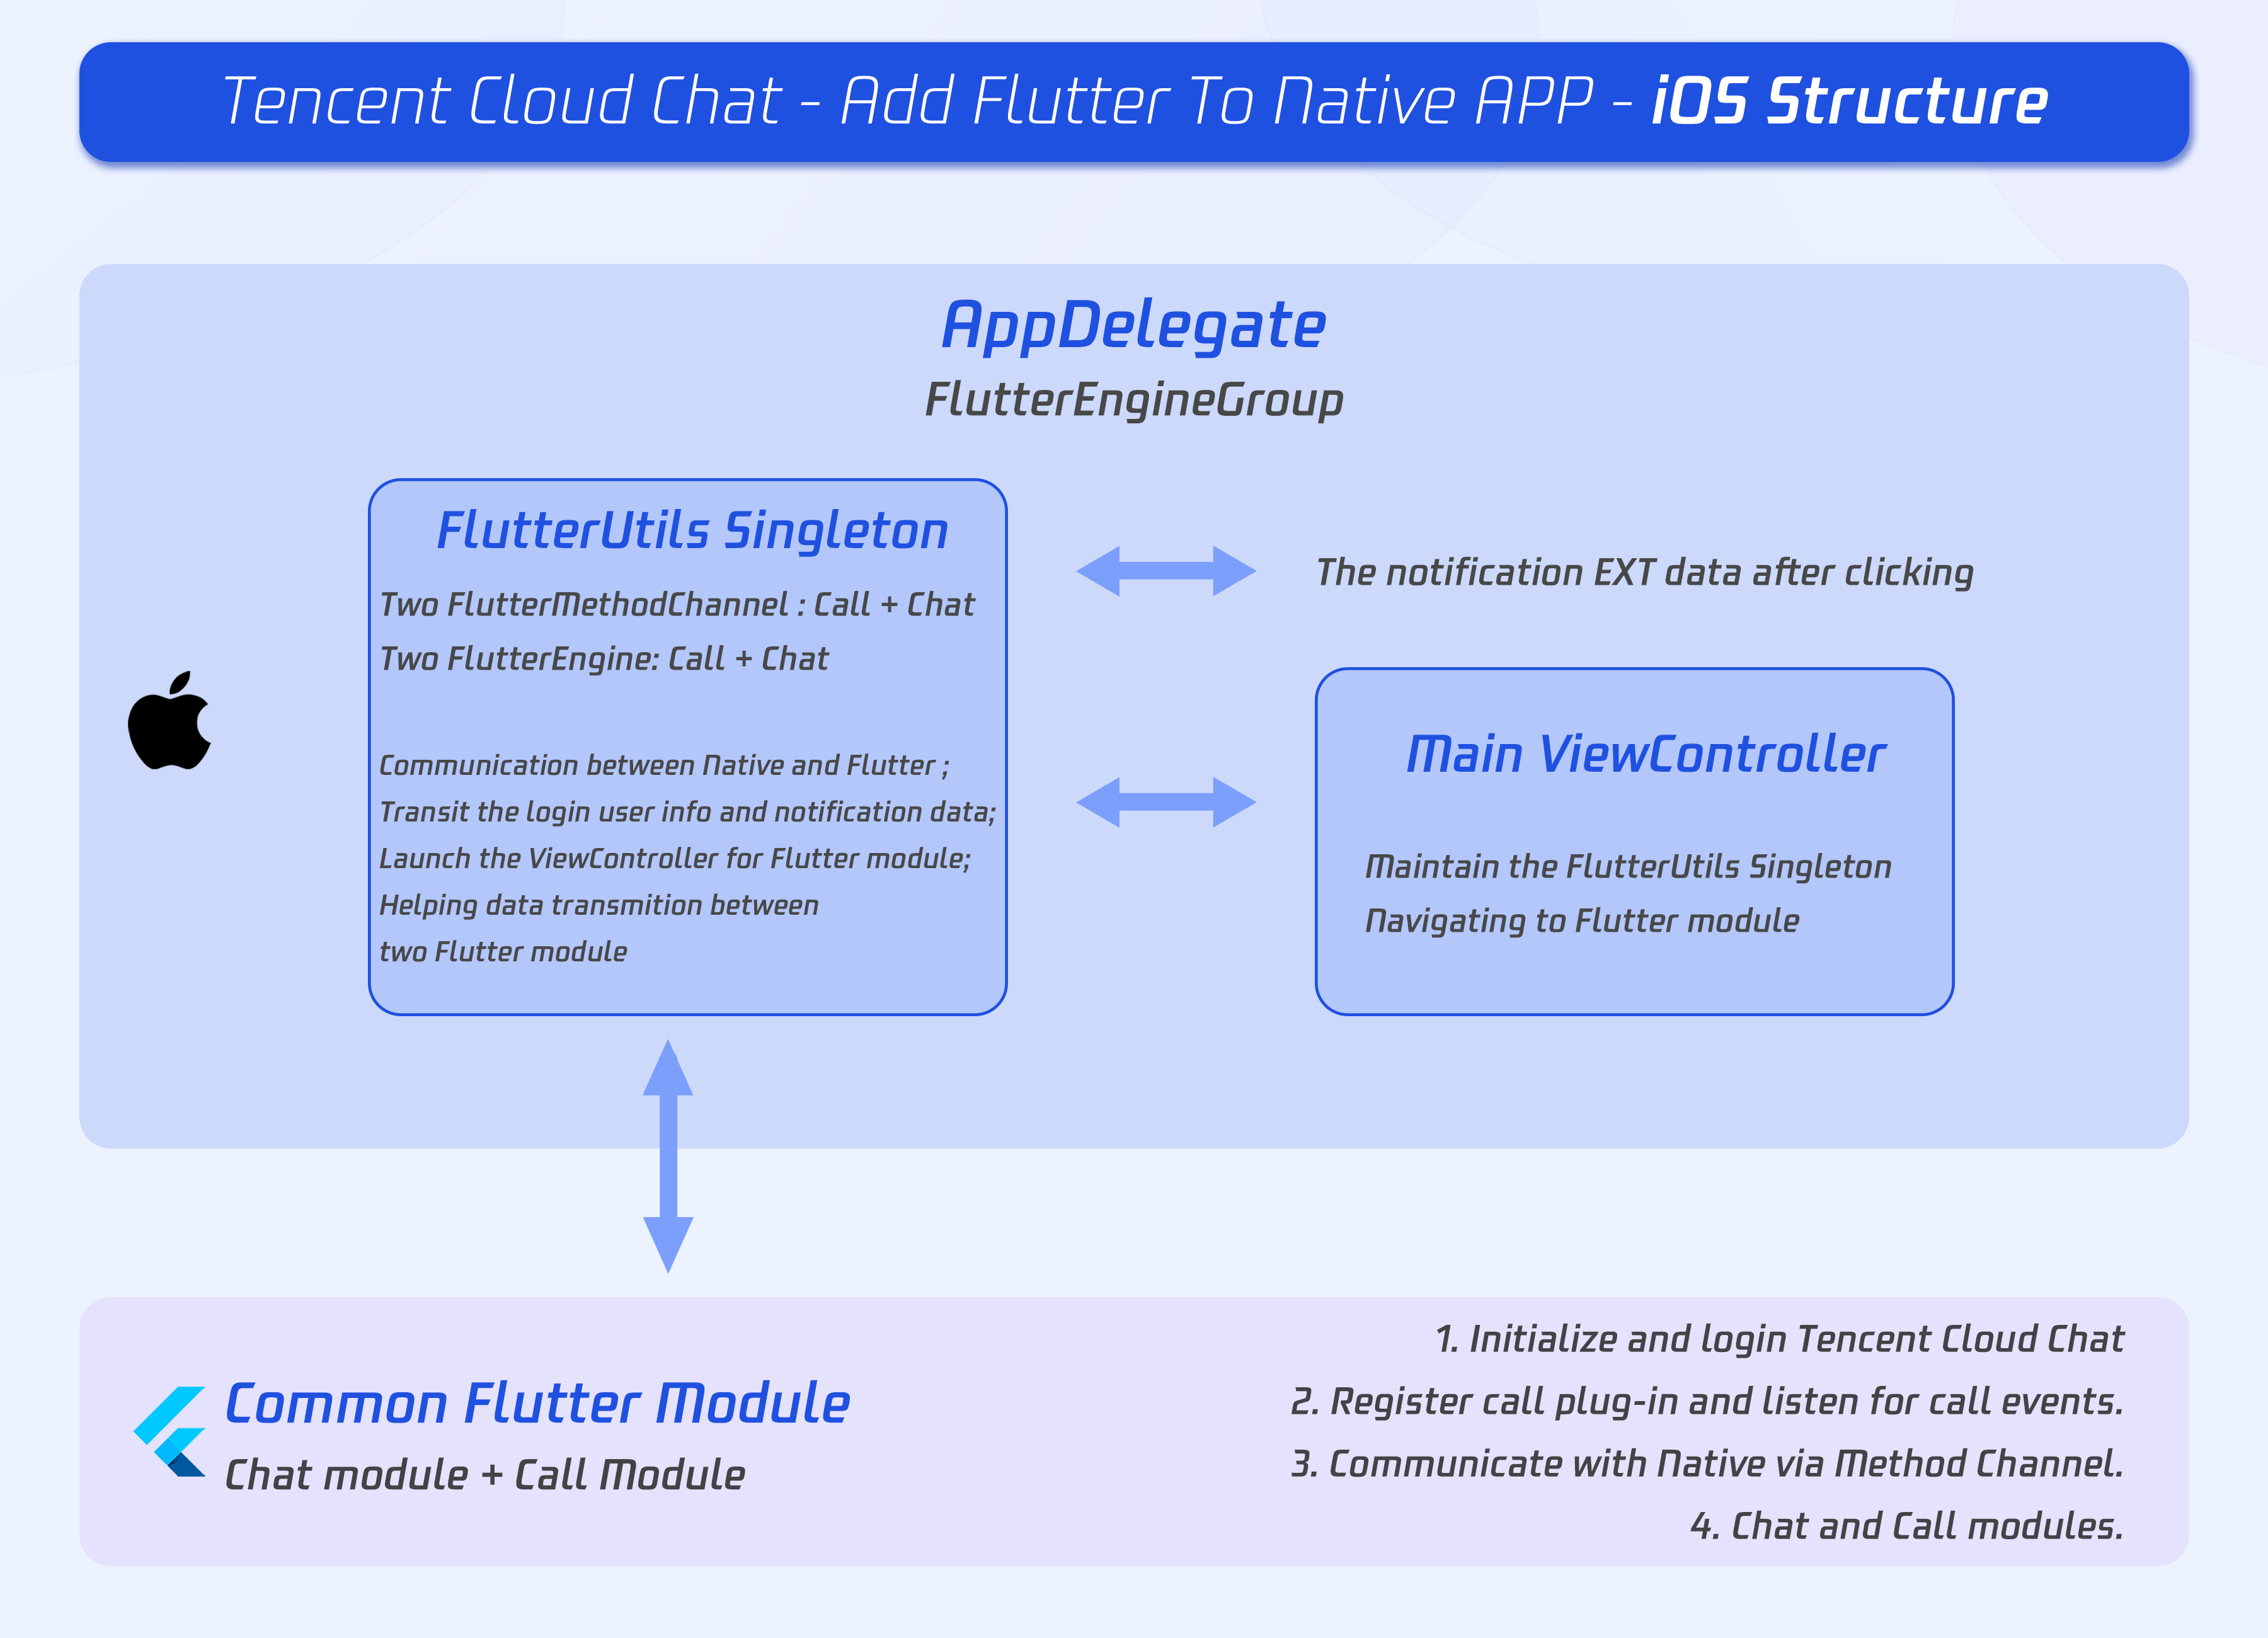
Create a FlutterEngineGroup to maintain and manage the FlutterEngines.
The proper place to create a FlutterEngineGroup is specific to your host app. As an example, we demonstrate creating a FlutterEngineGroup, exposed as a property, on app startup in the app delegate.
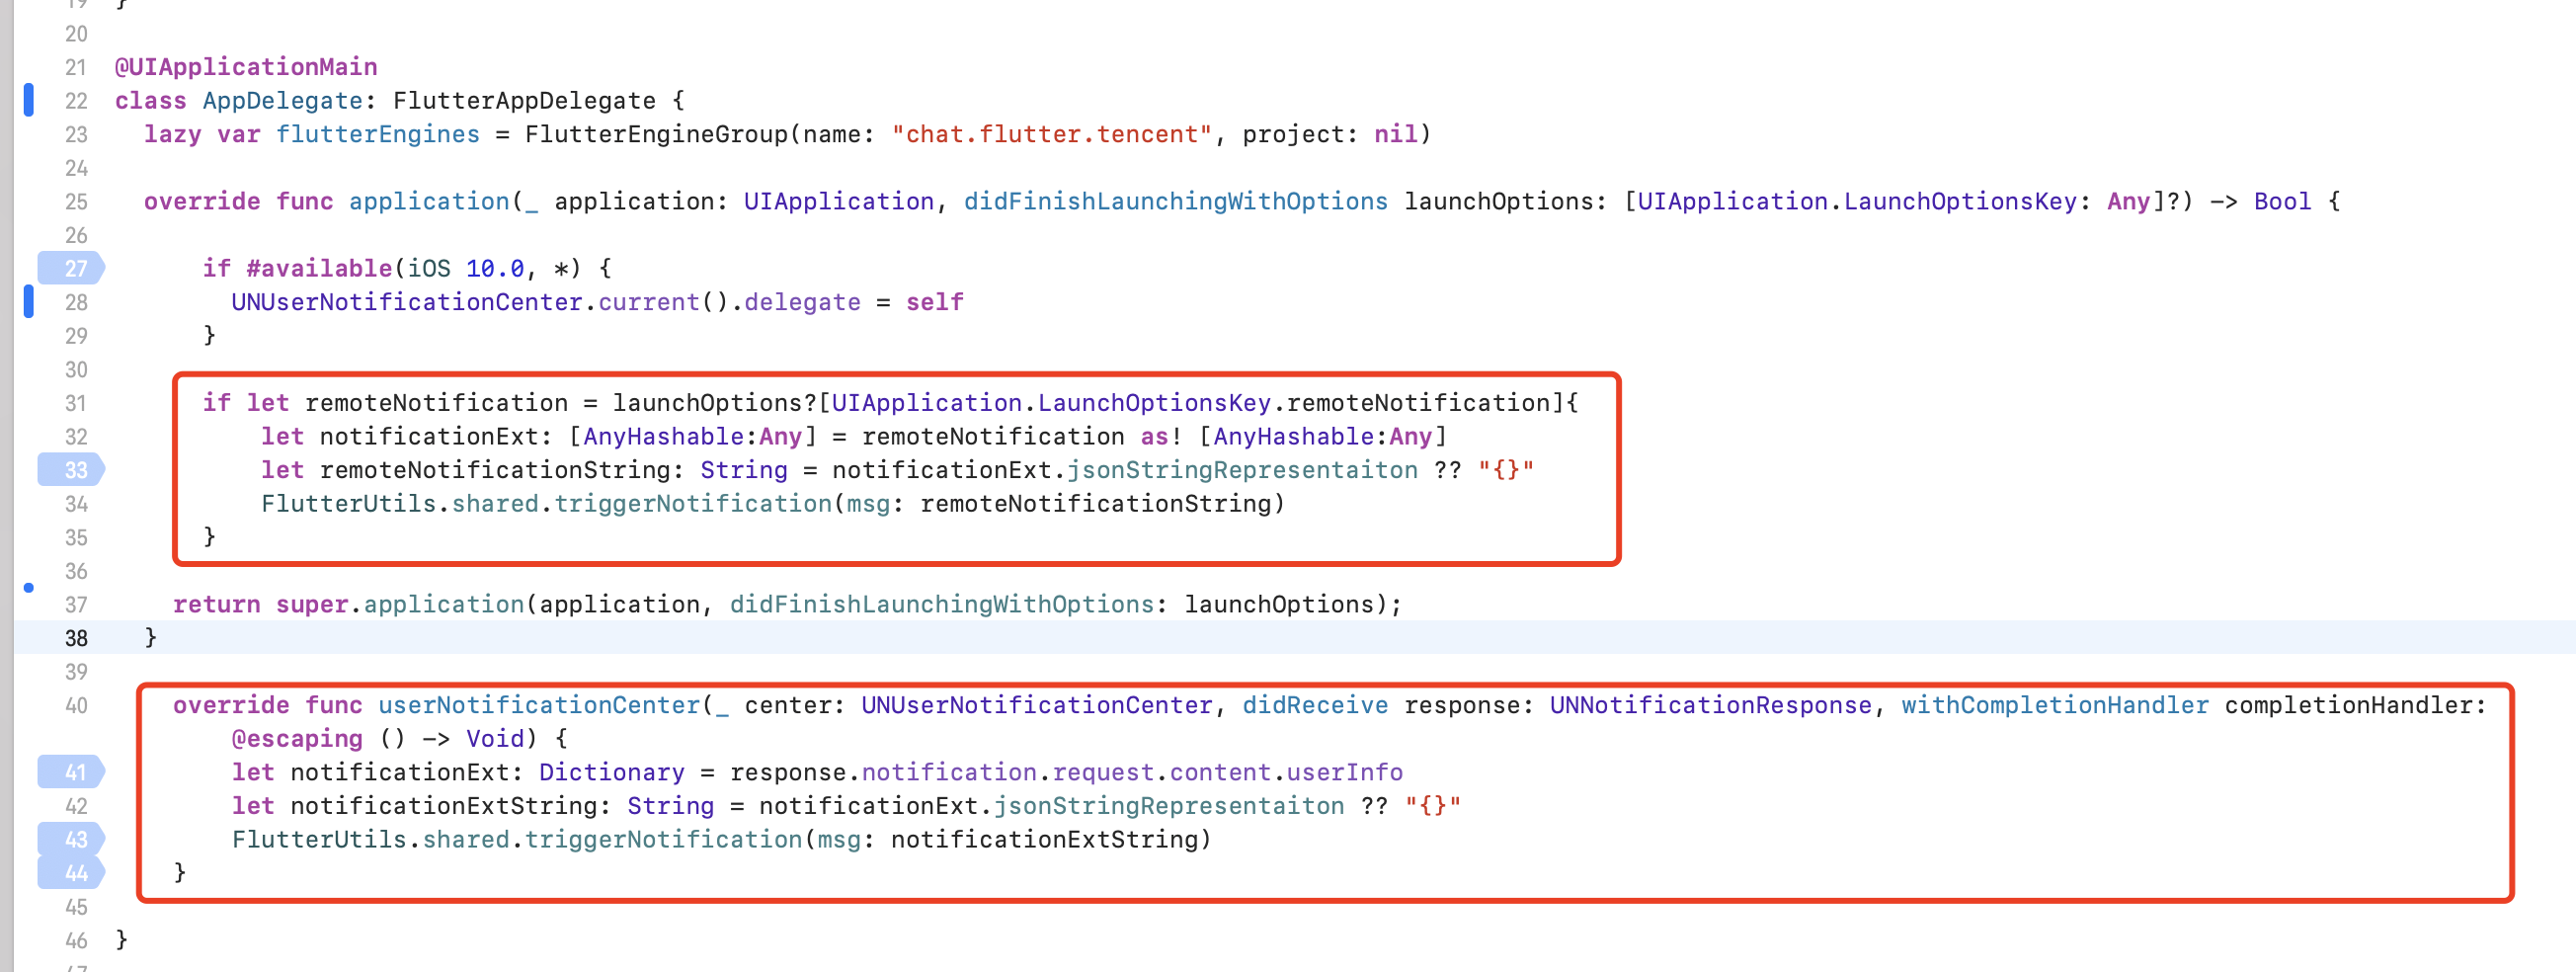
Add the following to AppDelegate.swift.
@UIApplicationMain
class AppDelegate: FlutterAppDelegate {
lazy var flutterEngines = FlutterEngineGroup(name: "chat.flutter.tencent", project: nil)
...
}
Create a singleton static object to hold FlutterEngines.
This singleton is used for managing those FlutterEngines in one place, and provides methods to the whole project to invoke methods related to the Flutter module.
The basic implementation logic of the demo is that, using a new navigator for the ViewController of Chat, while present and dismiss the ViewController of Call automatically.
Create a new file, FlutterUtils.swift, and coding, refer to our demo source code.
Mainly focus on:
- private override init(): Initialize each Flutter instance, register method channel events.
- func reportChatInfo(): Report the current user info to the Flutter module, for initialization and login Tencent Cloud Chat SDK.
- func launchCallFunc(): Present the ViewController for Call module, invoked when new call income or user active it manually from Chat module.
- func triggerNotification(msg: String): Transit the data of notification, after the user clicks it, and Chat module may navigate to the corresponding chat page.
Listening and transit the notification click event
Only transit of the data of notification after clicking is necessary as, the initialization of Push plug-in, uploading token and the navigating for notification clicking events have been done in Flutter Chat module.
The reason why we need to do this is because the clicking event has been consumed by Native, so it is impossible for the Flutter Push plug-in to receive this event.
Add the following codes to AppDelegate.swift.
Now, we finished the implementation for iOS.
Android Native Development
Here, we take Kotlin as an example, while Java is also available.
?
The following structure and code is for demonstration purposes only, you could modify it to meet your actual needs dynamically.
Open your Android project within Android Studio.
Import Flutter Module
Please refer to this part, adding the Flutter module to your existing Android app.
FlutterEngineGroup
Create a FlutterEngineGroup to maintain and manage the FlutterEngines.
The proper place to create a FlutterEngineGroup is specific to your host app. As an example, we demonstrate creating a FlutterEngineGroup, exposed as a property, on app startup in the app delegate.
Create a new file, FlutterUtils.kt, and define a singleton static object FlutterUtils.
@SuppressLint("StaticFieldLeak")
object FlutterUtils {}
Create a FlutterEngineGroup to maintain and manage the FlutterEngines.
Define a FlutterEngineGroup, FlutterEngines and corresponding MethodChannels in FlutterUtils.kt.
lateinit var context : Context
lateinit var flutterEngines: FlutterEngineGroup
private lateinit var chatFlutterEngine:FlutterEngine
private lateinit var callFlutterEngine:FlutterEngine

lateinit var chatMethodChannel: MethodChannel
lateinit var callMethodChannel: MethodChannel

// Initialize them
flutterEngines = FlutterEngineGroup(context)
...
Further developed for this singleton static object
The basic implementation logic of the demo is that, using a new navigator for the Activity for both Chat and Chat.
The Activity for Chat is entered and exited by the user, while the Activity for Call has been entered and exited automatically, triggered by the listener or making a call manually.
Mainly focus on:
- fun init(): Initialize each Flutter instance, register method channel events.
- fun reportChatInfo(): Report the current user info to the Flutter module, for initialization and login Tencent Cloud Chat SDK.
- fun launchCallFunc(): Present the
Activityfor Call module, invoked when new call income or user active it manually from Chat module. - fun triggerNotification(msg: String): Transit the data of notification, after the user clicks it, and Chat module may navigate to the corresponding chat page.
You can refer to the demo source code for this object.
Initialize the singleton static object above from the main entry MyApplication.
Transit the global context to the singleton static object, and initialize it from MyApplication.kt.
class MyApplication : MultiDexApplication() {

   override fun onCreate() {
       super.onCreate()
       FlutterUtils.context = this // new
       FlutterUtils.init()         // new
   }
}
Listening and transit the notification click event
Only transit of the data of notification after clicking is necessary as, the initialization of Push plug-in, uploading token and the navigating for notification clicking events have been done in Flutter Chat module.
The reason why we need to do this is the clicking event has been consumed by Android Kotlin, so it is impossible for the Flutter Push plug-in to receive this event.
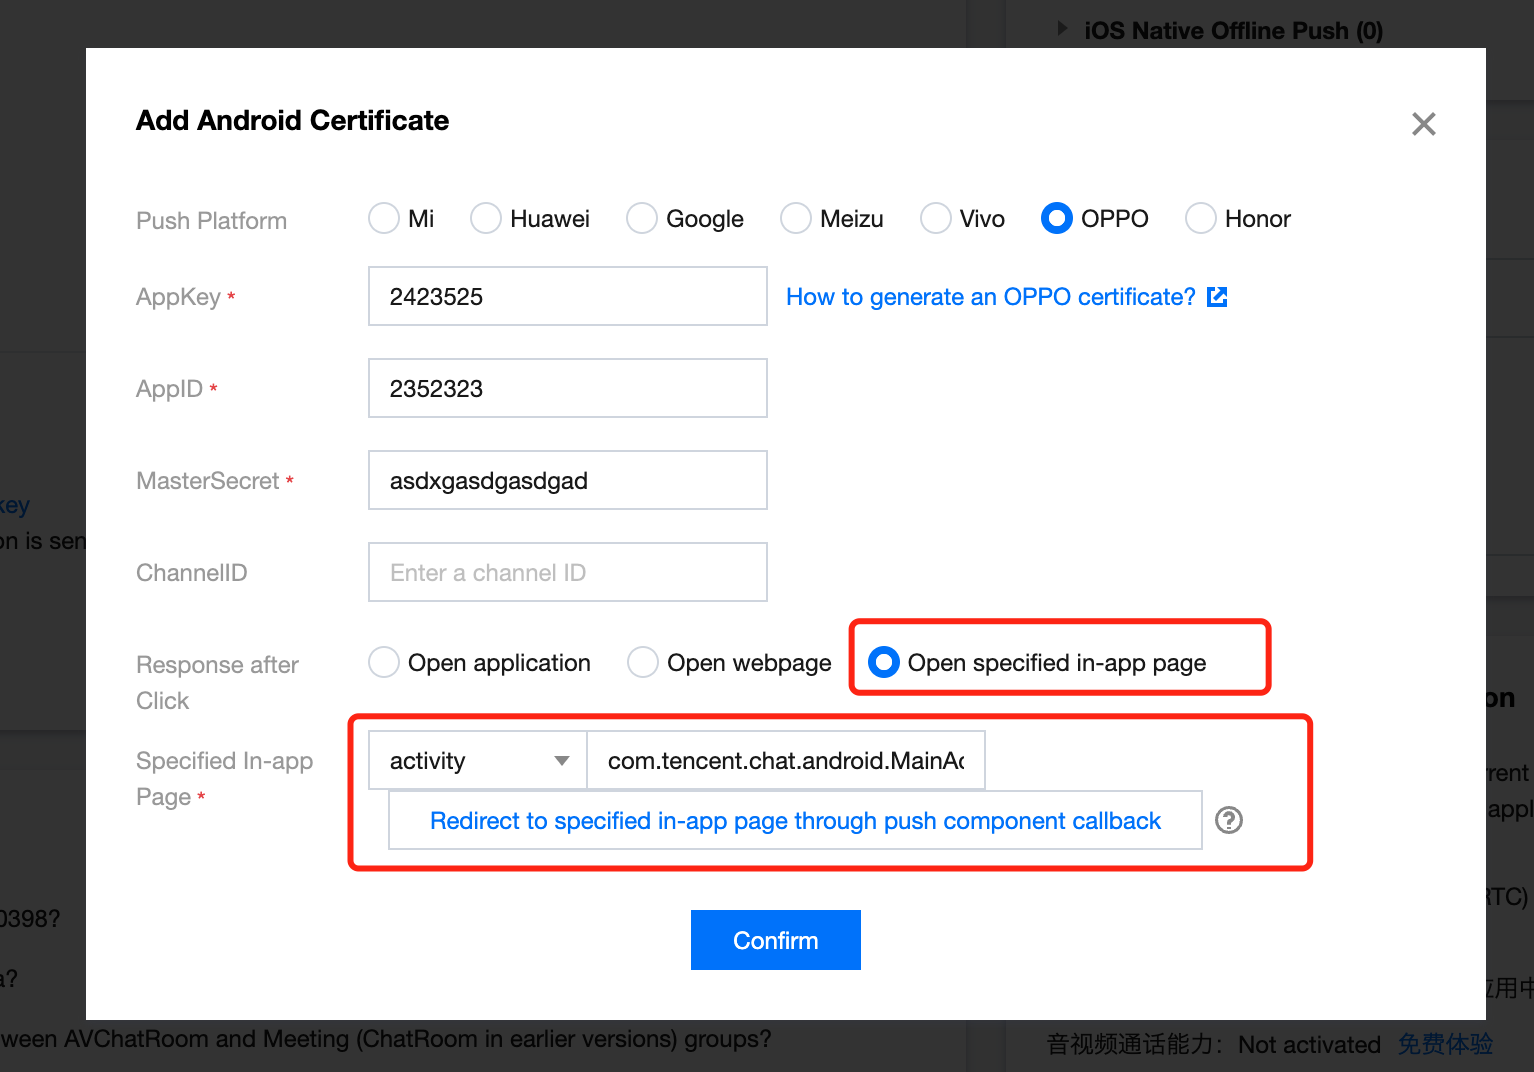
Due to the diversity and inconsistency among different manufacturers, we only take OPPO as an example. For the whole manufacturer's support, please refer to this documentation.
Add a new push certificate to the Tencent Cloud Chat console, Select Open specified in-app page > activity for the opening method and enter an activity to receive the notification clicking event with EXT data, it's suggested to set it as the home page or the main entrance. Like, we set MainActivity for our demo, com.tencent.chat.android.MainActivity.
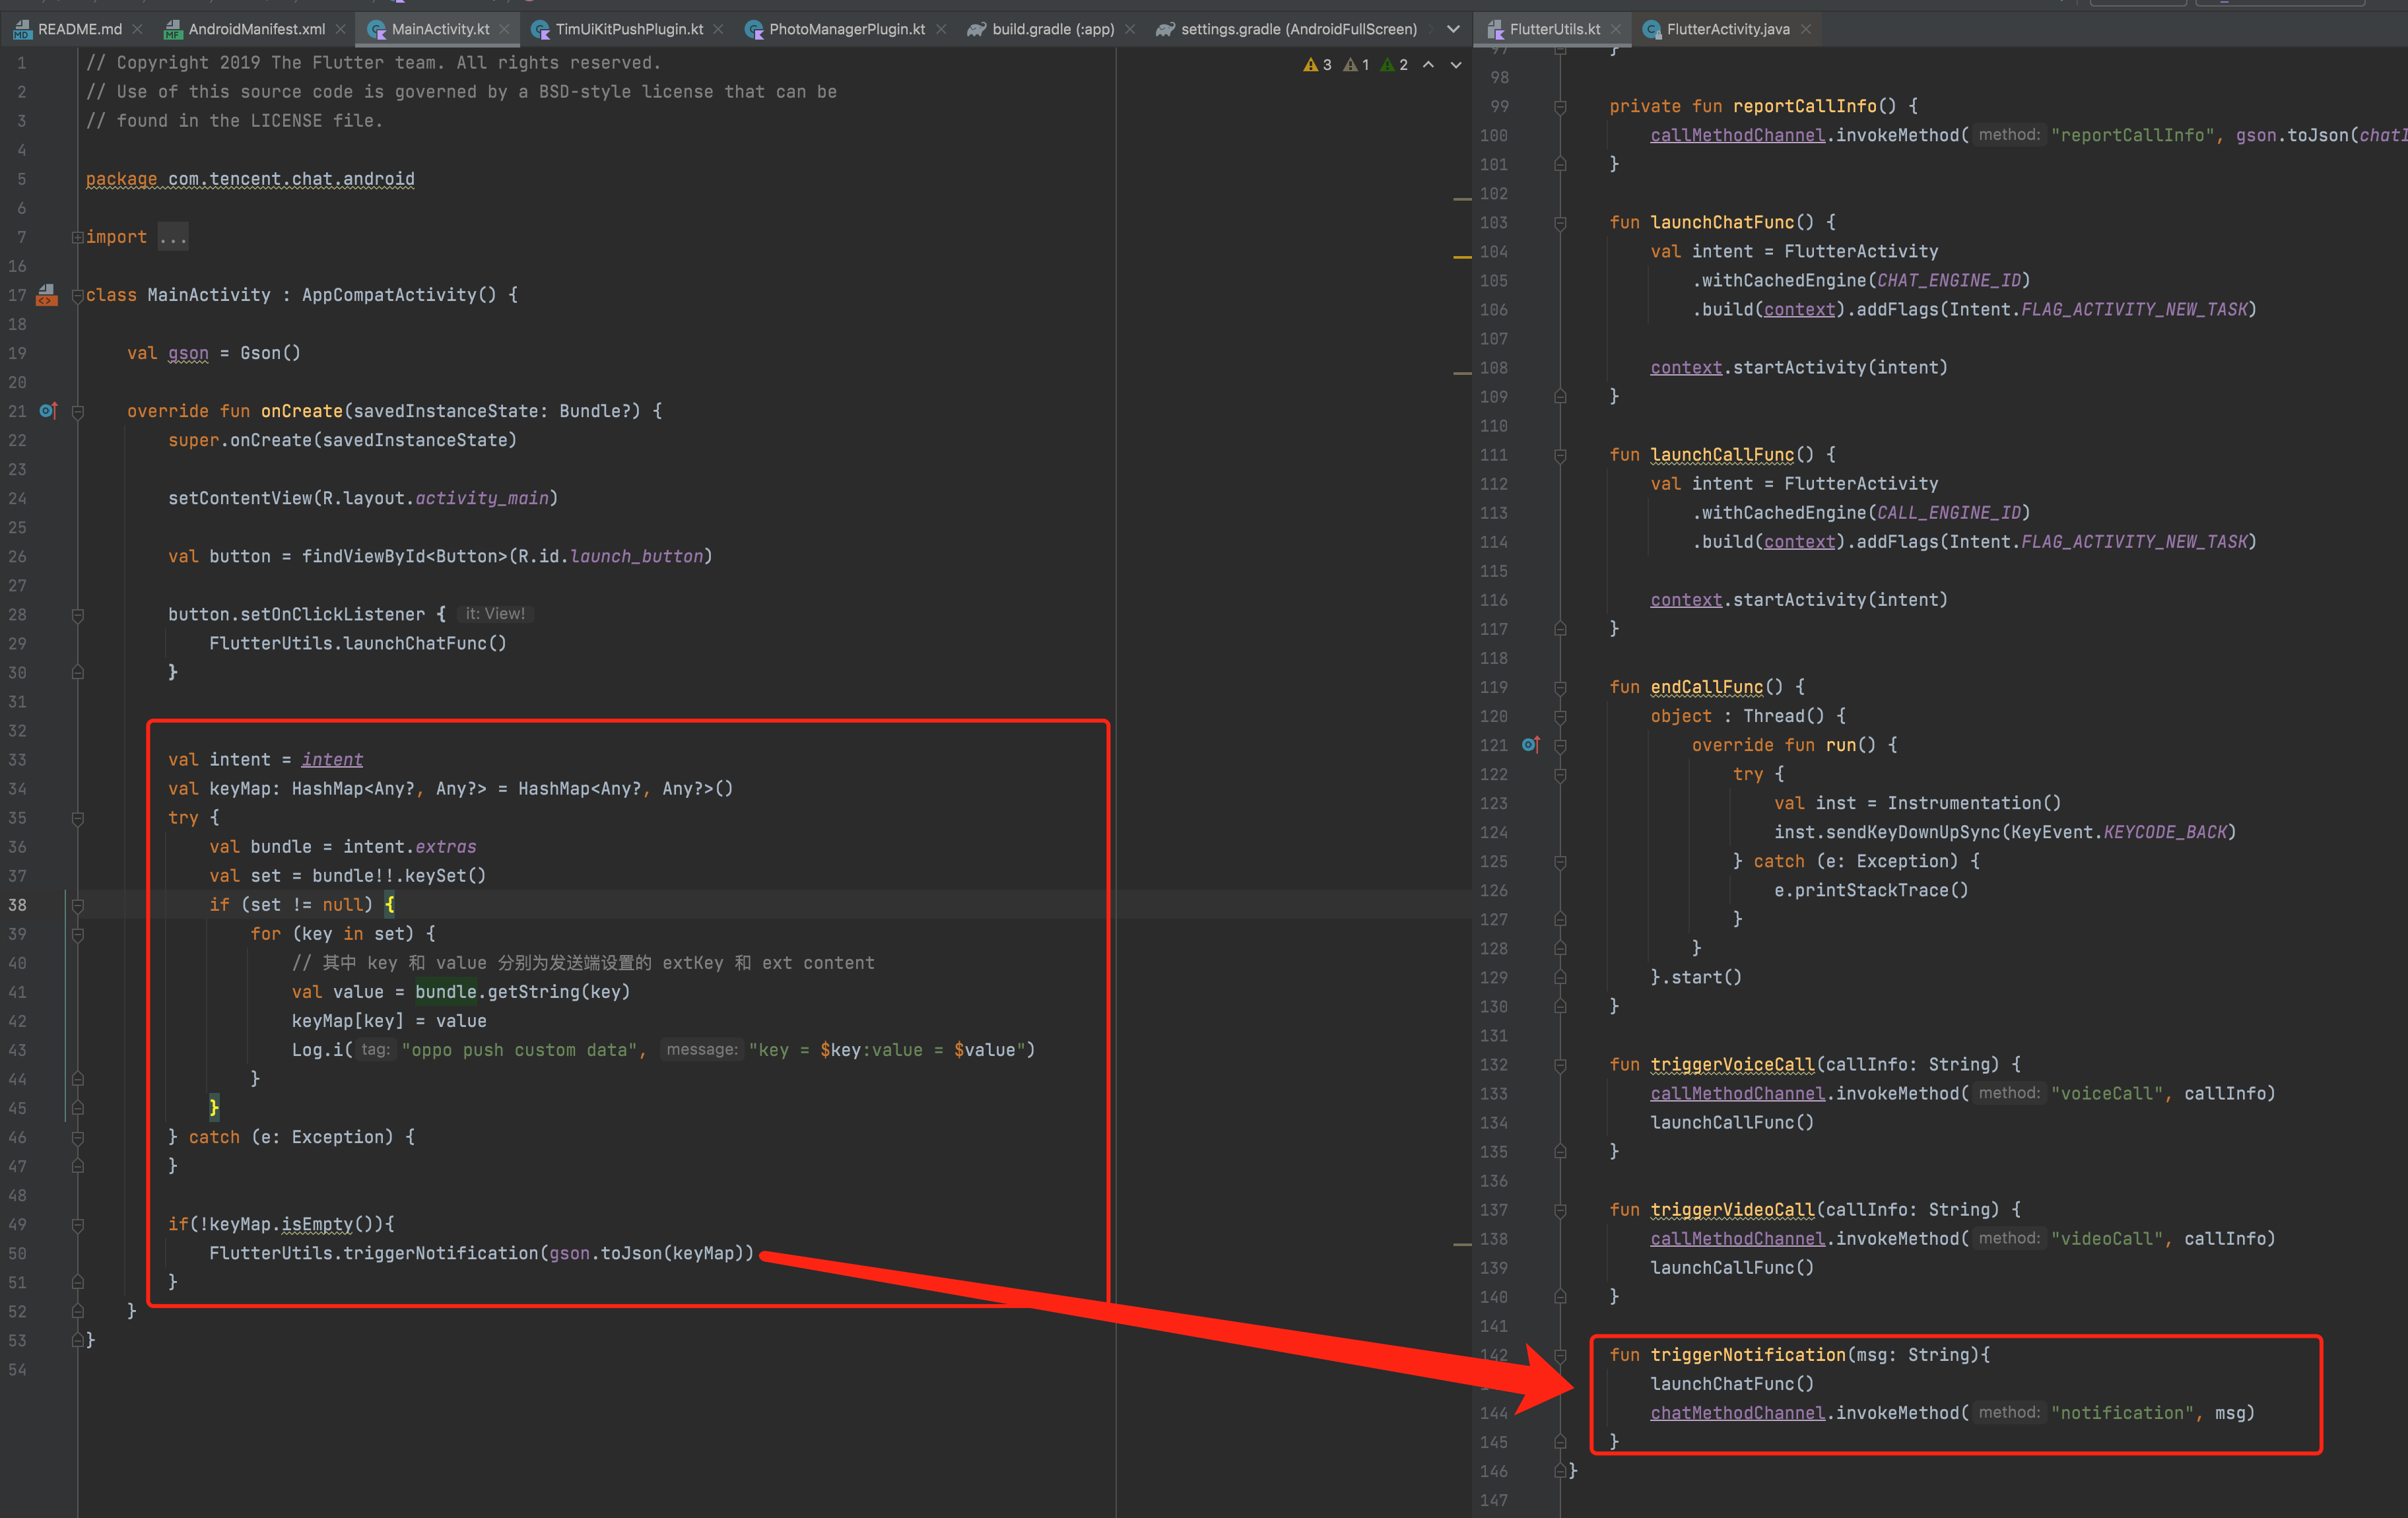
Adding the following codes to the Activity, set for the console above.
The EXT data of the notification can be found from Bundle when the Activity has been launched by the device, when the user clicks the notification.
You can receive the EXT from Activity, and transit them to Flutter.
You can refer to the demo source code for this capability.
Now, we finished the implementation for Android.
Solution B: Single FlutterEngine
In this solution, the Chat module and Call module embed in one single Flutter instance.
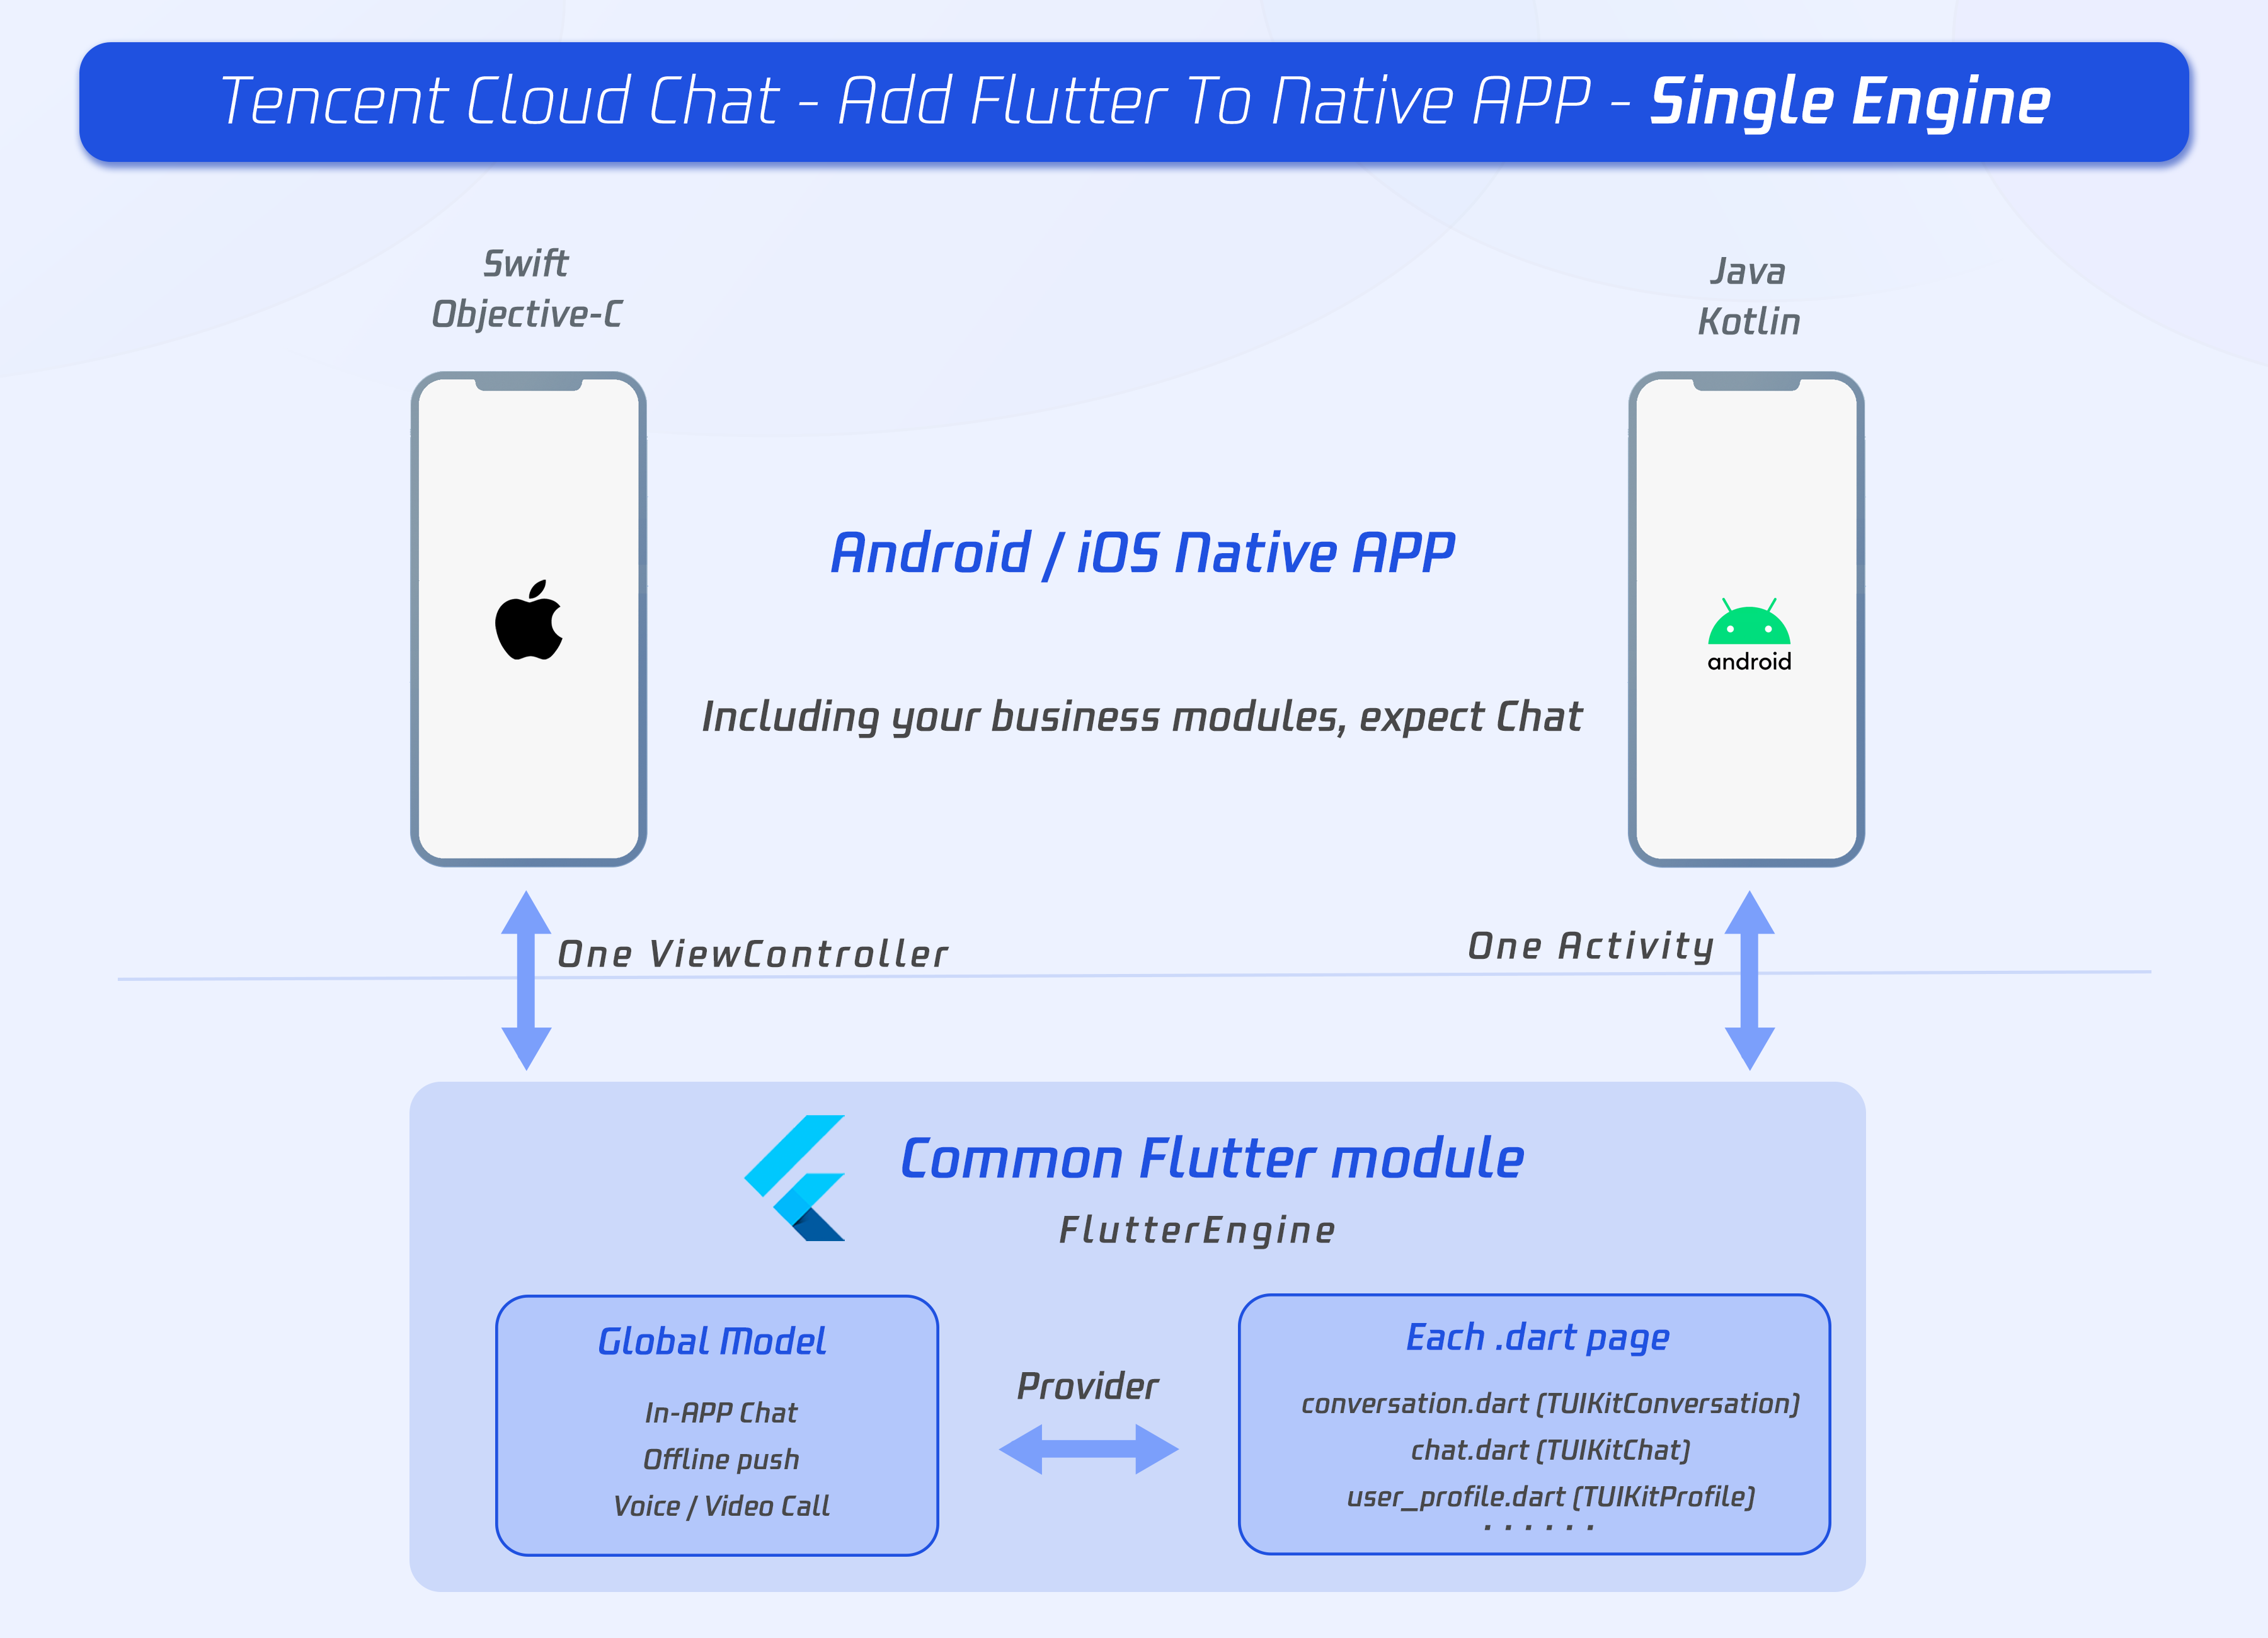
As a result, those modules can only be shown or hidden at the same time.
Flutter Module development
To embed Flutter into your existing application, first create a Flutter module.
From the command line, run:
cd some/path/
flutter create --template module tencent_chat_module
A Flutter module project is created at some/path/tencent_chat_module/. From that directory, you can run the same flutter commands you would in any other Flutter project, like flutter run --debug or flutter build ios. You can also run the module in Android Studio/IntelliJ or VS Code with the Flutter and Dart plugins. This project contains a single-view example version of your module before it’s embedded in your existing application, which is useful for incrementally testing the Flutter-only parts of your code.
The tencent_chat_module module directory structure is similar to a normal Flutter application:
tencent_chat_module/
├── .ios/
│   ├── Runner.xcworkspace
│   └── Flutter/podhelper.rb
├── lib/
│   └── main.dart
├── test/
└── pubspec.yaml
Now, we can code within lib/.
main.dart
Modify main.dart, integrating TUIKit, Offline Push plug-in and Call Plug-in.
The global state, method channel and our Tencent Cloud Chat SDKs, maintained by ChatInfoModel.
After receiving the login user info from Native, invoke _coreInstance.init() and _coreInstance.login() to initialize and login the SDK. Also, Call plug-in and Push plug-in need to be initialized.
?
Please configure the offline push before uploading the token and use this capability, referring to this documentation.
Tips for Call plug-in:
- Listening for the call invitation, when a new call comes, notify Native to launch the Flutter page if not currently located in.
Tips for Push plug-in:
- The callback event of notification clicking, transmitted from Native, and used for navigating to corresponding chat from EXT data.
Also, this is used as the home page of the chat module. It shows the loading status before logged in, followed by the conversation list.
Besides, the current status of the application needs to be reported to the Tencent Cloud Chat backend upon each foreground/background switch from here. Referring to this documentation.
Detailed implementation can refer to the source code of the demo.
Other widgets from TUIKit
-
Create a file,
push.dart, used for maintaining the offline push plugin. Detailed implementation can refer to the source code of the demo. -
Create a file,
conversation.dart, used to implement group profile widgetTIMUIKitGroupProfile. Detailed implementation can refer to the source code of the demo. -
Create a file,
user_profile.dart, used to implement the user profile widgetTIMUIKitProfile. Detailed implementation can refer to the source code of the demo. -
Create a file,
group_profile.dart, used to implement group profile widgetTIMUIKitGroupProfile. Detailed implementation can refer to the source code of the demo. -
Create a file,
chat.dart, used for implementing the history message list and sending messages widgetTIMUIKitChat. This page can also navigate touser_profile.dartandconversation.dart.Detailed implementation can refer to the source code of the demo.
Now, the Flutter module has been developed.
iOS Native development
Here, we take Swift as an example, while Objective-C is also available.
?
The following structure and code is for demonstration purposes only, you could modify it to meet your actual needs dynamically.
Open your iOS project within XCode.
If your existing application (MyApp) doesn’t already have a Podfile, follow the CocoaPods getting started guide to add a Podfile to your project.
Import Flutter Module
Please refer to this part, adding the Flutter module to your existing iOS app.
FlutterEngine
Create a FlutterEngine.
The proper place to create a FlutterEngine is specific to your host app. As an example, we demonstrate creating a FlutterEngine, exposed as a property, on app startup in the app delegate.
import UIKit
import Flutter
import FlutterPluginRegistrant

@UIApplicationMain
class AppDelegate: FlutterAppDelegate { // More on the FlutterAppDelegate.
 lazy var flutterEngine = FlutterEngine(name: "tencent cloud chat")

 override func application(_ application: UIApplication, didFinishLaunchingWithOptions launchOptions: [UIApplication.LaunchOptionsKey: Any]?) -> Bool {
   // Runs the default Dart entrypoint with a default Flutter route.
   flutterEngine.run();
   GeneratedPluginRegistrant.register(with: self.flutterEngine);
   return super.application(application, didFinishLaunchingWithOptions: launchOptions);
 }
}
Create a singleton static object to manage the FlutterEngine.
This singleton is used for managing FlutterEngine in one place, and provides methods to the whole project to invoke methods related to the Flutter module.
The basic implementation logic of the demo is that, using a new navigator for the ViewController of Flutter module, and show or hidden can be handled automatically according to call.
Create a new file, FlutterUtils.swift, and coding, refer to our demo source code.
Mainly focus on:
- private override init(): Initialize each Flutter instance, register method channel events.
- func reportChatInfo(): Report the current user info to the Flutter module, for initialization and login Tencent Cloud Chat SDK.
- func launchChatFunc(): Present the ViewController for Flutter module.
- func triggerNotification(msg: String): Transit the data of notification, after the user clicks it, and Chat module may navigate to the corresponding chat page.
Listening and transit the notification click event
Only transit of the data of notification after clicking is necessary as, the initialization of Push plug-in, uploading token and the navigating for notification clicking events have been done in Flutter Chat module.
The reason why we need to do this is the clicking event has been consumed by iOS Swift, so it is impossible for the Flutter Push plug-in to receive this event.
Add the following codes to AppDelegate.swift.
Now, we finished the implementation for iOS.
Android Native Development
Here, we take Kotlin as an example, while Java is also available.
?
The following structure and code is for demonstration purposes only, you could modify it to meet your actual needs dynamically.
Open your Android project within Android Studio.
Import Flutter Module
Please refer to this part, adding the Flutter module to your existing Android app.
FlutterEngine
Create a singleton static object to manage the FlutterEngine.
This singleton is used for managing FlutterEngine in one place, and provides methods to the whole project to invoke methods related to the Flutter module.
Create a new file, FlutterUtils.kt, and define a singleton static object FlutterUtils.
@SuppressLint("StaticFieldLeak")
object FlutterUtils {}
Create a FlutterEngine.
Define a FlutterEngine and corresponding MethodChannel in FlutterUtils.kt.
lateinit var context : Context
private lateinit var flutterEngine:FlutterEngine

// 初始化
flutterEngine = FlutterEngine(context)
Further developed for this singleton static object
The basic implementation logic of the demo is that, using a new navigator for the Activity of Flutter module, and show or hidden can be handled automatically according to call.
Mainly focus on:
- fun init(): Initialize each Flutter instance, register method channel events.
- fun reportChatInfo(): Report the current user info to the Flutter module, for initialization and login Tencent Cloud Chat SDK.
- fun launchChatFunc(): Present the
Activityfor Flutter module. - fun triggerNotification(msg: String): Transit the data of notification, after the user clicks it, and Chat module may navigate to the corresponding chat page.
Detailed implementation can refer to the source code of the demo.
Initialize the singleton static object above from the main entry MyApplication.
Transit the global context to the singleton static object, and initialize it from MyApplication.kt.
class MyApplication : MultiDexApplication() {

   override fun onCreate() {
       super.onCreate()
       FlutterUtils.context = this // new
       FlutterUtils.init()         // new
   }
}
Listening and transit the notification click event
Only transit of the data of notification after clicking is necessary as, the initialization of Push plug-in, uploading token and the navigating for notification clicking events have been done in Flutter Chat module.
The reason why we need to do this is the clicking event has been consumed by Android Kotlin, so it is impossible for the Flutter Push plug-in to receive this event.
Due to the diversity and inconsistency among different manufacturers, we only take OPPO as an example. For the whole manufacturer's support, please refer to this documentation.
Add a new push certificate to the Tencent Cloud Chat console, Select Open specified in-app page > activity for the opening method and enter an activity to receive the notification clicking event with EXT data, it's suggested to set it as the home page or the main entrance. Like, we set MainActivity for our demo, com.tencent.chat.android.MainActivity.
Adding the following codes to the Activity, set for the console above.
The EXT data of the notification can be found from Bundle when the Activity has been launched by the device, when the user clicks the notification.
You can receive the EXT from Activity, and transit them to Flutter.
You can refer to the demo source code for this capability.
Now, we finished the implementation for Android.
Additional solution: Initialize Tencent Cloud Chat from Native
Sometimes, you may prefer to integrate a chat module to your existing UI without a complex chat page.
Like, assuming that you have a game, and hope players can chat with each other during the match, without navigating to the full screen chat page.
Means, you may not wish to launch a complex Flutter engine, before the user switches to the chat page, but hope they can still chat in a small module directly.
In this case, you are supposed to initialize and login Tencent Cloud Chat with Native SDK.
? However, you can also choose to initialize and login within Flutter up to your needs. This process should only be executed once, no matter where you execute it.
It's unnecessary to import Native SDK manually, as our Flutter SDK can help you integrate it.
Initialize and login
Take the iOS Swift code as an example to demonstrate how to initialize and log in at Native.
import ImSDK_Plus


func initTencentChat(){
       if(isLoginSuccess == true){
           return
       }
       let data = V2TIMManager.sharedInstance().initSDK( Yours SDKAPPID , config: nil);
       if (data == true){
           V2TIMManager.sharedInstance().login(
               chatInfo.userID,
               userSig: chatInfo.userSig,
               succ: {
                   self.isLoginSuccess = true
                   self.reportChatInfo()
               },
               fail: onLoginFailed()
           )
       }
}
After that, you could use the API provided by Native SDK to implement your chat modules to your existing UI page manually.
For more information about the Native SDK, please refer to this documentation.
Initialize Flutter TUIKit
The current user info should be provided to Flutter TUIKit, after initialized and logged in from Native, by invoking _coreInstance.setDataFromNative().
final CoreServicesImpl _coreInstance = TIMUIKitCore.getInstance();
_coreInstance.setDataFromNative(userId: chatInfo?.userID ?? "");
You can refer to the demo source code for this module.
That's all you need to add Tencent Cloud Chat to your existing application.
You can easily add In-App Chat and Voice/Video Call to your application with Flutter.
If there's anything unclear or you have more ideas, feel free to contact us!
- Telegram Group: https://t.me/+1doS9AUBmndhNGNl
- WhatsApp Group: https://chat.whatsapp.com/Gfbxk7rQBqc8Rz4pzzP27A
- QQ Group: 788910197, chat in Chinese